Building MVP apps: MVP Part I
Chris Ramsdale, Google Developer Relations
Updated March 2010
Also see Part II of this article.
Building any large scale application has its hurdles, and GWT apps are no exception. Multiple developers working simultaneously on the same code base, while maintaining legacy features and functionality, can quickly turn into messy code. To help sort things out we introduce design patterns to create compartmentalized areas of responsibility within our project.
There are various design patterns to choose from; Presentation-abstraction-control, Model-view-controller, Model-view-presenter, etc... And while each pattern has its benefits, we have found that a Model-view-presenter (MVP) architecture works best when developing GWT apps for two main reasons. First the MVP model, much like other design patterns, decouples development in a way that allows multiple developers to work simultaneously. Secondly, this model allows us to minimize our use of GWTTestCase, which relies on the presence of a browser, and, for the bulk of our code, write lightweight (and fast) JRE tests (which don't require a browser).
At the heart of this pattern is the separation of functionality into components that logically make sense, but in the case of GWT there is a clear focus on making the view as simple as possible in order to minimize our reliance on GWTTestCase and reduce the overall time spent running tests.
Building an MVP-based application can be straightforward and easy once you understand the fundamentals behind this design pattern. To help explain these concepts we will use a simple Contacts application as an example. This application will allow users to view, edit, and add contacts to a list of contacts that are stored on the server.
To begin we will break our application up into the following components:
We'll then look into how each of these components interact by digging into:
Sample Project
The sample project, referenced throughout this tutorial, can be found at Tutorial-Contacts.zip.
Model
A model encompasses business objects, and in the case of our Contacts application we have:
- Contact: A representation of a contact within the contact list. For simplicity, this object contains a first name, last name, and email address. In a more complex application, this object would have more fields.
- ContactDetails: A light version of the Contact that contains only the unique identifier and display name. This "light" version of the Contact object will make the Contact list retrieval more efficient, as there will be fewer bits to serialize and transport across the wire. In the case of our example application, this optimization has less impact than it would in a more complex app where Contact objects have substantially more fields. The initial RPC will return a list of ContactDetails, and we've added a display name field so that there is some amount of data that can be displayed (within the ContactsView) without having to making subsequent RPCs.
View
A view contains all of the UI components that make up our application. This includes any tables, labels, buttons, textboxes, etc... Views are responsible for the layout of the UI components and have no notion of the model. That is to say a view doesn't know that it is displaying a Contact, it simply knows that it has, for example, 3 labels, 3 textboxes, and 2 buttons that are organized in a vertical fashion. Switching between views is tied to the history management within the presentation layer.
The views in our Contacts application are:
- ContactsView
- EditContactView
The EditContactView is used to add new contacts as well as editing existing contacts.
Presenter
A presenter contains all of the logic for our Contacts application, including history management, view transition and data sync via RPCs back to the server. As a general rule, for every view you'll want a presenter to drive the view and handle events that are sourced from the UI widgets within the view.
For our sample we have the following Presenters:
- ContactsPresenter
- EditContactPresenter
Just as with the view, the EditContactPresenter adds new contacts as well as edits existing contacts.
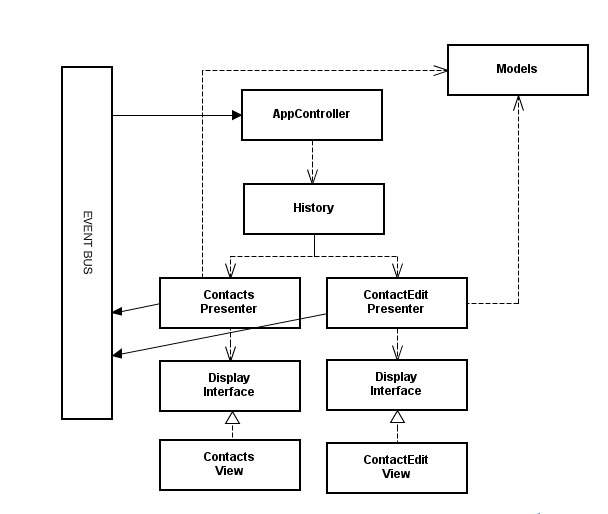
AppController
To handle logic that is not specific to any presenter and instead resides at the application layer, we'll introduce the AppController component. This component contains the history management and view transition logic. View transition is directly tied to the history management and is discussed in greater length below.
At this point the overall hierarchy of our sample project should look like the following:
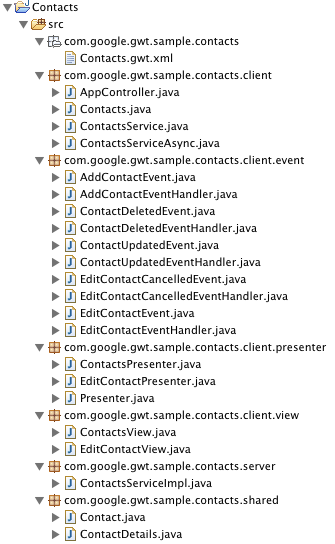
With our component structure in place, and before we jump into wiring it all up, we'll want to take a look at the process that starts everything up. The general flow, as shown in the following code, is:
- GWT's bootstrap process calls onModuleLoad()
- onModuleLoad() creates the RPC service, Event Bus, and the AppController
- The AppController is passed the RootPanel instance and takes over
- From then on the AppController is in control of creating specific presenters and supplying a view that the presenter will drive.
public class Contacts implements EntryPoint {

  public void onModuleLoad() {
    ContactsServiceAsync rpcService = GWT.create(ContactsService.class);
    EventBus eventBus = new SimpleEventBus();
    AppController appViewer = new AppController(rpcService, eventBus);
    appViewer.go(RootPanel.get());
  }
}
Binding presenters and views
In order to bind the presenter and associated view together we'll rely on Display interfaces that are defined within the presenter. Take for example the ContactsView:
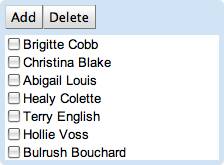
This view has 3 widgets: a table and two buttons. In order for the app to do something meaningful, the presenter is going to need to:
- Respond to button clicks
- Populate the list
- Respond to a user clicking on a contact in the list
- Query the view for selected contacts
In the case of our ContactsPresenter, we define the Display interface as such:
public class ContactsPresenter implements Presenter {
  ...
  public interface Display extends HasValue<List<String>> {
    HasClickHandlers getAddButton();
    HasClickHandlers getDeleteButton();
    HasClickHandlers getList();
    void setData(List<String> data);
    int getClickedRow(ClickEvent event);
    List<Integer> getSelectedRows();
    Widget asWidget();
  }
}
While the ContactsView implements the above interface using Buttons and a FlexTable, the ContactsPresenter is none the wiser. In addition, if we wanted to run this application within a mobile browser we could switch out the views without having to change any of the surrounding application code. To be transparent, with methods such as getClickedRow() and getSelectedRows() the presenter is making the assumption that a view is going to display the data in the form of a list. That said, it's at a high enough level that a view is still able to switch out the specific implementation of the list without any side effects. Method setData() is a simple way of getting model data into the view without the view having intrinsic knowledge of the model itself. The data being displayed is directly tied to the complexity of our model. A more complex model may lead to more data being displayed in a view. The beauty of using setData() is that changes to the model can be made without updating the view code.
To show you how this works, let's look at the code that is executed upon receiving the list of Contacts from the server:
public class ContactsPresenter implements Presenter {
  ...
  private void fetchContactDetails() {
    rpcService.getContactDetails(new AsyncCallback<ArrayList<ContactDetails>>() {
      public void onSuccess(ArrayList<ContactDetails> result) {
          contacts = result;
          List<String> data = new ArrayList<String>();

          for (int i = 0; i < result.size(); ++i) {
            data.add(contacts.get(i).getDisplayName());
          }

          display.setData(data);
      }

      public void onFailure(Throwable caught) {
        ...
      }
    });
  }
}
To listen for UI events we have the following:
public class ContactsPresenter implements Presenter {
  ...
  public void bind() {
    display.getAddButton().addClickHandler(new ClickHandler() {
      public void onClick(ClickEvent event) {
        eventBus.fireEvent(new AddContactEvent());
      }
    });

    display.getDeleteButton().addClickHandler(new ClickHandler() {
      public void onClick(ClickEvent event) {
        deleteSelectedContacts();
      }
    });

    display.getList().addClickHandler(new ClickHandler() {
      public void onClick(ClickEvent event) {
        int selectedRow = display.getClickedRow(event);

        if (selectedRow >= 0) {
          String id = contacts.get(selectedRow).getId();
          eventBus.fireEvent(new EditContactEvent(id));
        }
      }
    });
  }
}
To respond to UI events, such as the user deleting a list of selected contacts, we have the following:
public class ContactsPresenter implements Presenter {
  ...
  private void deleteSelectedContacts() {
    List<Integer> selectedRows = display.getSelectedRows();
    ArrayList<String> ids = new ArrayList<String>();

    for (int i = 0; i < selectedRows.size(); ++i) {
      ids.add(contactDetails.get(selectedRows.get(i)).getId());
    }

    rpcService.deleteContacts(ids, new AsyncCallback<ArrayList<ContactDetails>>() {
      public void onSuccess(ArrayList<ContactDetails> result) {
        contactDetails = result;
        List<String> data = new ArrayList<String>();

        for (int i = 0; i < result.size(); ++i) {
          data.add(contactDetails.get(i).getDisplayName());
        }

        display.setData(data);
      }

      public void onFailure(Throwable caught) {
        ...
      }
    });
  }
}
Again, in order to reap the benefits of the MVP model, the
presenter should have no knowledge of any widget-based
code. So long as we wrap a view in a display interface that can be mocked and
our JRE tests never call asWidget(), all is grand. That's how
you can have your cake and eat it too: minimize the GWT ties to allow
a non-GWTTestCase to be useful, but still have the ability to slap a Display
instance into a panel.
Events and the Event Bus
Once you have presenters sinking events that are sourced by widgets within views, you'll want to take some action on these events. To do so, you'll want to rely on an Event Bus that is built on top of GWT's EventBus such as SimpleEventBus. The Event Bus is a mechanism for a) passing events and b) registering to be notified of some subset of these events.
It's important to keep in mind that not all events should be placed on the Event Bus. Blindly dumping all of the possible events within your app on the Event Bus can lead to chatty applications that get bogged down in event handling. Not to mention, you'll find yourself writing a fair amount of boilerplate code to define, source, sink, and act upon these events.
App-wide events are really the only events that you want to be passing around on the Event Bus. The app is uninterested in events such as "the user clicked enter" or "an RPC is about to be made". Instead (at least in our example app), we pass around events such as a contact being updated, the user switching to the edit view, or an RPC that deleted a user has successfully returned from the server.
Below is a list of the events that we have defined.
- AddContactEvent
- ContactDeletedEvent
- ContactUpdatedEvent
- EditContactCancelledEvent
- EditContactEvent
Each of these events will extend Event and override dispatch() and getAssociatedType(). Method dispatch() takes a single param of type EventHandler, and for our application we have defined handler interfaces for each of our events.
- AddContactEventHandler
- ContactDeletedEventHandler
- ContactUpdatedEventHandler
- EditContactCancelledEventHandler
- EditContactEventHandler
To demonstrate how these pieces fit together let's look at what takes place when a user chooses to edit a contact. First we'll need the AppController to register for the EditContactEvent. To do so, we call EventBus.addHandler() and pass in the Event.Type as well as the handler that should be called when the event is fired. The code below shows how the AppController registers to receive EditContactEvents.
public class AppController implements ValueChangeHandler {
  ...
  eventBus.addHandler(EditContactEvent.TYPE,
      new EditContactEventHandler() {
        public void onEditContact(EditContactEvent event) {
          doEditContact(event.getId());
        }
      });
  ...
}
Here the AppController has an instance of the EventBus, called eventBus, and is registering a new EditContactEventHandler. This handler will grab the id of the contact to be edited, and pass it to the doEditContact() method whenever an event of EditContactEvent.getAssociatedType() is fired. Multiple components can be listening for a single event, so when an event is fired using the EventBus.fireEvent(), the EventBus looks for any component that has added a handler for event.getAssociatedType(). For each component that has a handler, the EventBus calls event.dispatch() with that component's EventHandler interface.
To see how an event is fired, let's take a look at the code that sources the EditContactEvent. As mentioned above, we've added ourselves as a click handler on the ListContactView's list. Now when a user clicks on the contacts list, we'll notify the rest of the app by calling the EventBus.fireEvent() method with a EditContactEvent() class that is initialized with the id of the contacts to be edited.
public class ContactsPresenter {
  ...
  display.getList().addClickHandler(new ClickHandler() {
    public void onClick(ClickEvent event) {
      int selectedRow = display.getClickedRow(event);

      if (selectedRow >= 0) {
        String id = contactDetails.get(selectedRow).getId();
        eventBus.fireEvent(new EditContactEvent(id));
      }
    }
  });
  ...
}
View transition is a proactive event flow, where the event source lets the rest of the app know, "Hey a view transition is about to take place, so if you have some last minute cleanup work to do, I'd suggest you do it now". With RPC it's a bit different. The event is fired when the RPC returns rather than before the RPC is made. The reason being is that the app is really only concerned when some state has changed (contact values changed, contact deleted, etc...), which is the case after the RPC has returned.
Below is an example of the event that is fired upon successfully updating a contact.
public class EditContactPresenter {
  ...
  private void doSave() {
    contact.setFirstName(display.getFirstName().getValue());
    contact.setLastName(display.getLastName().getValue());
    contact.setEmailAddress(display.getEmailAddress().getValue());

    rpcService.updateContact(contact, new AsyncCallback<Contact>() {
        public void onSuccess(Contact result) {
          eventBus.fireEvent(new ContactUpdatedEvent(result));
        }
        public void onFailure(Throwable caught) {
           ...
        }
    });
  }
  ...
}
History and view transitions
One of the more integral parts of any web app is the handling of history events. History events are token strings that represent some new state within your application. Think of them as "markers" for where you are in the application. Take, for example, a user navigating from the "Contact List" view to the "Add Contact" view and then clicking the "Back" button. The resulting action should land the user back on the "Contact List" view, and to do so you would push the initial state (the "Contact List" view) onto the history stack followed by a push of the "Add Contact" view. Thus when they click the back button the "Add Contact" token will be popped off of the stack and the current history token will be the "Contact List" view.
Now that we have the flow straight, we need to decide where to put the code. Given that history is not specific to a particular view, it makes sense to add it to the AppController class.
To start with, we'll need to have the AppController implement ValueChangeHandler and declare its own onValueChange() method. The interface and parameter are of type String because the History events are simply the tokens that are pushed onto the stack.
public class AppController implements ValueChangeHandler<String> {
  ...
  public void onValueChange(ValueChangeEvent<String> event) {
    String token = event.getValue();
    ...
  }
}
Next we'll need to register to receive History events, much like we registered for events coming off of the EventBus.
public class AppController implements ValueChangeHandler<String> {
  ...
  private void bind() {
    History.addValueChangeHandler(this);
    ...
  }
}
In the example above, where the user navigates from the "Contact List" view to the "Add Contact" view, we mentioned setting an initial state. This is important because it not only gives us some starting point, but it's also the piece of code that will check for an existing history token (for example, if a user bookmarked a specific state within your app) and route the user to the appropriate view. The AppController's go() method, which is called after everything has been wired up, is where we'll add this logic.
public class AppController implements ValueChangeHandler<String> {
  ...
  public void go(final HasWidgets container) {
    this.container = container;

    if ("".equals(History.getToken())) {
      History.newItem("list");
    }
    else {
      History.fireCurrentHistoryState();
    }
  }
}
With the above plumbing in place, we need to do something meaningful within the onValueChange() method that is called whenever the user clicks the "Back" or "Forward" button. Using the getValue() of the event, we'll decide which view to show next.
public class AppController implements ValueChangeHandler<String> {
  ...
  public void onValueChange(ValueChangeEvent<String> event) {
    String token = event.getValue();

    if (token != null) {
      Presenter presenter = null;

      if (token.equals("list")) {
        presenter = new ContactsPresenter(rpcService, eventBus, new ContactView());
      }
      else if (token.equals("add")) {
        presenter = new EditContactPresenter(rpcService, eventBus, new EditContactView());
      }
      else if (token.equals("edit")) {
        presenter = new EditContactPresenter(rpcService, eventBus, new EditContactView());
      }

      if (presenter != null) {
        presenter.go(container);
      }
    }
}
Now when the user clicks the back button from the "Add Contact" view, GWT's History mechanism will call the onValueChange() method with the previous history token. In our example the previous view was the "Contact List" view and the previous history token (which was set in the go() method) is "list".
Handling history events in this manner isn't limited to just "Back" and "Forward" handling, they can used for all view transitions. Going back to the AppController's go() method, you'll notice that we call fireCurrentHistoryState() if the current History token is not null. Thus if user specifies http://myapp.com/contacts.html#add, the initial history token will be "add" and fireCurrentHistoryState() will in turn call the onValueChange() with this token. This isn't specific to just setting up the initial view with the app; other user interactions that result in a view transition can call History.newItem(), which will push a new history token onto the stack which will in turn trigger a call to onValueChange().
Below is an example of how you can hook up the ContactsPresenter to the "Add Contact" button, fire the associated event upon receiving the click, and transition to the "Add Contact" view as a result.
public class ContactsPresenter implements Presenter {
  ...
  public void bind() {
    display.getAddButton().addClickHandler(new ClickHandler() {
      public void onClick(ClickEvent event) {
        eventBus.fireEvent(new AddContactEvent());
      }
    });
  }
}
public class AppController implements ValueChangeHandler<String> {
  ...
  private void bind() {
    ...
    eventBus.addHandler(AddContactEvent.TYPE,
      new AddContactEventHandler() {
        public void onAddContact(AddContactEvent event) {
          doAddNewContact();
        }
    });
  }

  private void doAddNewContact() {
    History.newItem("add");
  }
}
Since the view transition logic is already built into the onValueChange() method, this provides a centralized, reusable way of navigating within the app.
Testing
The MVP model takes the pain out of unit testing a GWT app. That's not to say that you can't write unit tests without using the MVP model. In fact you can, but they will often times be slower than the average JRE-based JUnit test. Why? Well, in short, applications that don't utilize the MVP model will require test cases that test components that rely on a DOM being present, a Javascript engine, etc... Essentially these test cases need to run in a browser.
GWT's GWTTestCase makes this possible, as it will launch a "headless" browser to run each of the tests. The launching of the browser coupled with the actual execution of the test case is why these tests typically take longer than standard JRE tests. Within the MVP model, we strive to make a view, the component that encompasses the bulk of our code that relies on the DOM and Javascript engine, as small and as simplistic as possible. Less code equals less testing which means less time that it takes to actually run your tests. If the bulk of the code within your app is encompassed within a presenter, and that presenter relies strictly on JRE-based components, you can build the majority of your test cases as efficient, vanilla JUnit tests.
To demonstrate the benefits of using the MVP model to drive JRE-based unit tests, rather than those based on GWTTestCase, we've added the following tests to our Contacts app.
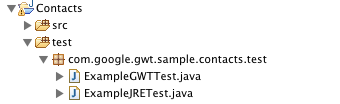
Each example is set up to test adding a list of ContactDetails, sorting those ContactDetails, and then verifying that the sorted list is correct. Taking a look at the ExampleJRETest, we have the following code.
public class ExampleJRETest extends TestCase {
  private ContactsPresenter contactsPresenter;
  private ContactsServiceAsync mockRpcService;
  private EventBus eventBus;
  private ContactsPresenter.Display mockDisplay;

  protected void setUp() {
    mockRpcService = createStrictMock(ContactsServiceAsync.class);
    eventBus = new SimpleEventBus();
    mockDisplay = createStrictMock(ContactsPresenter.Display.class);
    contactsPresenter = new ContactsPresenter(mockRpcService, eventBus, mockDisplay);
  }

  public void testContactSort(){
    List<ContactDetails> contactDetails = new ArrayList<ContactDetails>();
    contactDetails.add(new ContactDetails("0", "c_contact"));
    contactDetails.add(new ContactDetails("1", "b_contact"));
    contactDetails.add(new ContactDetails("2", "a_contact"));
    contactsPresenter.setContactDetails(contactDetails);
    contactsPresenter.sortContactDetails();
    assertTrue(contactsPresenter.getContactDetail(0).getDisplayName().equals("a_contact"));
    assertTrue(contactsPresenter.getContactDetail(1).getDisplayName().equals("b_contact"));
    assertTrue(contactsPresenter.getContactDetail(2).getDisplayName().equals("c_contact"));
  }
}
Because we have structured the view behind a Display interface, we're able to mock it out (using EasyMock in this example), remove the need for access to the browser's resources (DOM, Javascript engine, etc...), and avoid having to base our tests on GWTTestCase.
We then created the same test using GWTTestCase.
public class ExampleGWTTest extends GWTTestCase {
  private ContactsPresenter contactsPresenter;
  private ContactsServiceAsync rpcService;
  private EventBus eventBus;
  private ContactsPresenter.Display display;

  public String getModuleName() {
    return "com.google.gwt.sample.contacts.Contacts";
  }

  public void gwtSetUp() {
    rpcService = GWT.create(ContactsService.class);
    eventBus = new SimpleEventBus();
    display = new ContactsView();
    contactsPresenter = new ContactsPresenter(rpcService, eventBus, display);
  }

  public void testContactSort(){
    List<ContactDetails> contactDetails = new ArrayList<ContactDetails>();
    contactDetails.add(new ContactDetails("0", "c_contact"));
    contactDetails.add(new ContactDetails("1", "b_contact"));
    contactDetails.add(new ContactDetails("2", "a_contact"));
    contactsPresenter.setContactDetails(contactDetails);
    contactsPresenter.sortContactDetails();
    assertTrue(contactsPresenter.getContactDetail(0).getDisplayName().equals("a_contact"));
    assertTrue(contactsPresenter.getContactDetail(1).getDisplayName().equals("b_contact"));
    assertTrue(contactsPresenter.getContactDetail(2).getDisplayName().equals("c_contact"));
  }
}
Given that our app was designed using the MVP model, it realistically makes no sense to structure your tests like this. But that's not the point. The point is that ExampleGWTTest takes 15.23 secs to run, whereas the lightweight ExampleJRETest takes 0.01 secs. If you can manage to decouple app logic from widget-based code, your unit tests will be much more efficient. Imagine these numbers applied across the board to the hundreds of automated tests that are run on each build.
For more information on testing and the MVP model, checkout the article, Testing Methodologies Using GWT.
Follow-up topics
The MVP architecture is expansive; in future articles we look to discuss the following concepts:
- UI Binder and MVP
- Code splitting an MVP-based app
- Using Gin to reduce code and facilitate testing