Adding the Application Logic.
Up till now, we've designed our UI using UiBinders.
In this section, we'll learn how to add logic to our UI. We'll touch on very basic data modelling and how to handle widget events.
-
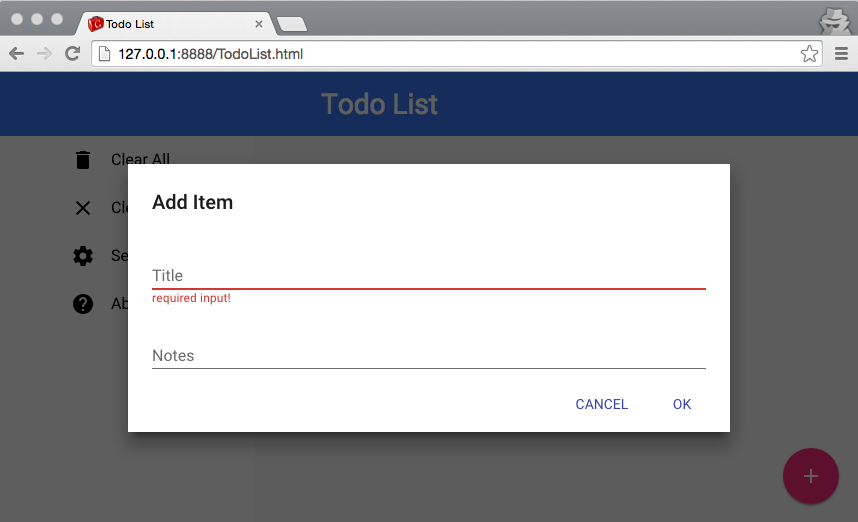
Create the Add Item dialog by adding the following markup to the Main.ui.xml file:
<ui:style> ... .content { padding: 15px; } .dialog { min-width: 40%; } </ui:style> <g:HTMLPanel> ... <p:PaperDialog ui:field="addItemDialog" entryAnimation="fade-in-animation" addStyleNames="{style.dialog}" modal="true"> <h2>Add Item</h2> <p:PaperInput ui:field="titleInput" label="Title" required="true" autoValidate="true" errorMessage="required input!"/> <div class="textarea-container iron-autogrow-textarea"> <p:PaperTextarea ui:field="descriptionInput" label="Notes"/> </div> <div class="buttons"> <p:PaperButton attributes="dialog-dismiss">Cancel</p:PaperButton> <p:PaperButton ui:field="confirmAddButton" attributes="dialog-confirm">OK</p:PaperButton> </div> </p:PaperDialog> </g:HTMLPanel>Tip: You can use attributes to quickly define certain polymer actions such as
entry-animation='fade-in-animation'.Note: When there are attributes in the component no mapped to a Java method, you can use the
attributeskey, like we do in theCancelandOKbuttons. Visit paper-dialog page page and check out API Reference section for more information -
Add all the fields defined in the
Main.ui.xmlfile to theMain.javaclass.@UiField PaperDrawerPanel drawerPanel; @UiField HTMLPanel content; @UiField PaperDialog addItemDialog; @UiField PaperInput titleInput; @UiField PaperTextarea descriptionInput; -
Bind the click handler method to the floating action button in the
Main.java@UiHandler("addButton") protected void onAddButtonClick(ClickEvent e) { addItemDialog.open(); } -
Reload the application
Now you can open the dialog by clicking on the floating action button in the bottom right corner.
-
Create a
UiBinderwidget for displaying items:Item.ui.xmlandItem.java-
Item.ui.xml<ui:UiBinder xmlns:ui='urn:ui:com.google.gwt.uibinder' xmlns:g='urn:import:com.google.gwt.user.client.ui' xmlns:p='urn:import:com.vaadin.polymer.paper.widget' xmlns:i='urn:import:com.vaadin.polymer.iron.widget'> <ui:style> @external .done; .item .done { text-decoration: line-through; } .title { padding-left: 20px; font-size: 150%; font-weight: normal; } </ui:style> <g:HTMLPanel addStyleNames="vertical center-justified layout {style.item}"> <style> </style> <div class="vertical-section"> <h4> <p:PaperCheckbox ui:field="done"></p:PaperCheckbox> <span ui:field="title" class='{style.title}'>Go to Google</span> </h4> <div ui:field="description" class='{style.description}'></div> </div> </g:HTMLPanel> </ui:UiBinder>
-
-
Item.java: For simplicity, we will use this class as the item POJOpackage org.gwtproject.tutorial.client; import com.google.gwt.core.shared.GWT; import com.google.gwt.dom.client.Element; import com.google.gwt.uibinder.client.UiBinder; import com.google.gwt.uibinder.client.UiField; import com.google.gwt.uibinder.client.UiHandler; import com.google.gwt.user.client.ui.Composite; import com.google.gwt.user.client.ui.HTMLPanel; import com.vaadin.polymer.iron.widget.event.IronChangeEvent; import com.vaadin.polymer.paper.widget.PaperCheckbox; public class Item extends Composite { interface ItemUiBinder extends UiBinder<HTMLPanel, Item> { } private static ItemUiBinder ourUiBinder = GWT.create(ItemUiBinder.class); @UiField Element title; @UiField Element description; @UiField PaperCheckbox done; public Item() { initWidget(ourUiBinder.createAndBindUi(this)); } @UiHandler("done") protected void change(IronChangeEvent ev) { if (done.getActive()) { title.addClassName("done"); } else { title.removeClassName("done"); } } public String getTitle() { return title.getInnerText(); } public void setTitle(String s) { title.setInnerText(s); } public String getDescription() { return description.getInnerText(); } public void setDescription(String s) { description.setInnerText(s); } public boolean isDone() { return done.getActive(); } public void setDone(boolean b) { done.setActive(b); } }
-
Add the logic for creating items when we click the save button.
At this point your
Main.javashould be like this:package org.gwtproject.tutorial.client; import com.google.gwt.core.client.GWT; import com.google.gwt.event.dom.client.ClickEvent; import com.google.gwt.uibinder.client.UiBinder; import com.google.gwt.uibinder.client.UiField; import com.google.gwt.uibinder.client.UiHandler; import com.google.gwt.user.client.ui.Composite; import com.google.gwt.user.client.ui.HTMLPanel; import com.vaadin.polymer.paper.widget.*; public class Main extends Composite { interface MainUiBinder extends UiBinder<HTMLPanel, Main> { } private static MainUiBinder ourUiBinder = GWT.create(MainUiBinder.class); @UiField HTMLPanel content; @UiField PaperDialog addItemDialog; @UiField PaperInput titleInput; @UiField PaperTextarea descriptionInput; public Main() { initWidget(ourUiBinder.createAndBindUi(this)); } @UiHandler("addButton") protected void onAddButtonClick(ClickEvent e) { addItemDialog.open(); } @UiHandler("confirmAddButton") protected void onConfirmAddButtonClick(ClickEvent e) { if (!titleInput.getValue().isEmpty()) { addItem(titleInput.getValue(), descriptionInput.getValue()); // clear text fields titleInput.setValue(""); descriptionInput.setValue(""); } } private void addItem(String title, String description) { Item item = new Item(); item.setTitle(title); item.setDescription(description); content.add(item); } } -
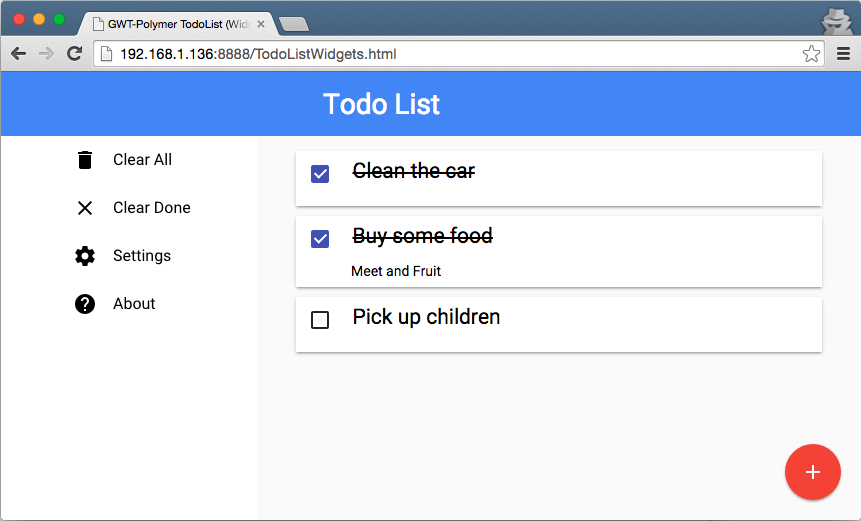
Reload the application
Now you can add Todo items and mark them as done using checkboxes.
-
Add the Clear All and Clear Done menu item handlers
@UiHandler("menuClearAll") protected void menuClearAll(ClickEvent e) { closeMenu(); content.clear(); } @UiHandler("menuClearDone") protected void menuClearDone(ClickEvent e) { closeMenu(); for (int i = content.getWidgetCount() - 1; i > -1; i--) { Item item = (Item)content.getWidget(i); if (item.isDone()) { content.remove(item); } } } private void closeMenu() { if (drawerPanel.getNarrow()) { drawerPanel.closeDrawer(); } }Note: The closeMenu() method is only useful if the application is viewed on a mobile device, or if your browser window is narrow enough for the side menu to collapse. Hence, we use this method to hide the menu after clicking on any menu item.
-
The final
Main.javashould look like thispackage org.gwtproject.tutorial.client; import com.google.gwt.core.client.GWT; import com.google.gwt.event.dom.client.ClickEvent; import com.google.gwt.uibinder.client.UiBinder; import com.google.gwt.uibinder.client.UiField; import com.google.gwt.uibinder.client.UiHandler; import com.google.gwt.user.client.ui.Composite; import com.google.gwt.user.client.ui.HTMLPanel; import com.vaadin.polymer.paper.widget.PaperDialog; import com.vaadin.polymer.paper.widget.PaperDrawerPanel; import com.vaadin.polymer.paper.widget.PaperInput; import com.vaadin.polymer.paper.widget.PaperTextarea; public class Main extends Composite { interface MainUiBinder extends UiBinder<HTMLPanel, Main> { } private static MainUiBinder ourUiBinder = GWT.create(MainUiBinder.class); @UiField PaperDrawerPanel drawerPanel; @UiField HTMLPanel content; @UiField PaperDialog addItemDialog; @UiField PaperInput titleInput; @UiField PaperTextarea descriptionInput; public Main() { initWidget(ourUiBinder.createAndBindUi(this)); } @UiHandler("addButton") protected void onAddButtonClick(ClickEvent e) { addItemDialog.open(); } @UiHandler("confirmAddButton") protected void onConfirmAddButtonClick(ClickEvent e) { if (!titleInput.getValue().isEmpty()) { addItem(titleInput.getValue(), descriptionInput.getValue()); // clear text fields titleInput.setValue(""); descriptionInput.setValue(""); } } private void addItem(String title, String description) { Item item = new Item(); item.setTitle(title); item.setDescription(description); content.add(item); } @UiHandler("menuClearAll") protected void menuClearAll(ClickEvent e) { closeMenu(); content.clear(); } private void closeMenu() { if (drawerPanel.getNarrow()) { drawerPanel.closeDrawer(); } } @UiHandler("menuClearDone") protected void menuClearDone(ClickEvent e) { closeMenu(); for (int i = content.getWidgetCount() - 1; i > -1; i--) { Item item = (Item)content.getWidget(i); if (item.isDone()) { content.remove(item); } } } } -
Reload the application
- Add several items
- Mark some of them as done
- Click on "Clear Done" menu item
- Click on "Clear All" menu item
Summary
In this chapter we have learned how to:
- Add more widgets to our Application.
- Add event handlers to UiBinder components.
- Use good looking Polymer components like dialogs and buttons.
- Handle very basic Data Model in GWT.