Server Communication
At some point, most GWT applications will need to interact with a backend server. GWT provides a couple of different ways to communicate with a server via HTTP. You can use the GWT RPC framework to transparently make calls to Java servlets and let GWT take care of low-level details like object serialization. Alternatively, you can use GWT's HTTP client classes to build and send custom HTTP requests.
Note: To run through the steps to communicate with a server in a sample GWT application, see the tutorial Communicating with the server.
- Server-side Code
- Remote Procedure Calls
- RPC Plumbing Diagram
- Creating Services
- Implementing Services
- Actually Making a Call
- Serializable Types
- Customizing Serialization
- Handling Exceptions
- Architectural Perspectives
- Deploying RPC
- Making HTTP requests
- Getting Used to Asynchronous Calls
- Direct-Eval RPC
See also the Request Factory documentation.
Server-side Code
Everything that happens within your web server is referred to as server-side processing. When your application running in the user's browser needs to interact with your server (for example, to load or save data), it makes an HTTP request across the network using a remote procedure call (RPC). While processing an RPC, your server is executing server-side code.
GWT provides an RPC mechanism based on Java Servlets to provide access to server-side resources. This mechanism includes generation of efficient client-side and server-side code to serialize objects across the network using deferred binding.
Tip: Although GWT translates Java into JavaScript for client-side code, GWT does not meddle with your ability to run Java bytecode on your server whatsoever. Server-side code doesn't need to be translatable, so you're free to use any Java library you find useful.
GWT does not limit you to this one RPC mechanism or server-side development environment. You are free to integrate with other RPC mechanisms, such as JSON using the GWT supplied RequestBuilder class, JSNI methods or a third party library.
Remote Procedure Calls
A fundamental difference between AJAX applications and traditional HTML web applications is that AJAX applications do not need to fetch new HTML pages while they execute. Because AJAX pages actually run more like applications within the browser, there is no need to request new HTML from the server to make user interface updates. However, like all client/server applications, AJAX applications usually do need to fetch data from the server as they execute. The mechanism for interacting with a server across a network is called making a remote procedure call (RPC), also sometimes referred to as a server call. GWT RPC makes it easy for the client and server to pass Java objects back and forth over HTTP. When used properly, RPCs give you the opportunity to move all of your UI logic to the client, resulting in greatly improved performance, reduced bandwidth, reduced web server load, and a pleasantly fluid user experience.
The server-side code that gets invoked from the client is often referred to as a service, so the act of making a remote procedure call is sometimes referred to as invoking a service. To be clear, though, the term service in this context is not the same as the more general "web service" concept. In particular, GWT services are not related to the Simple Object Access Protocol (SOAP).
RPC Plumbing Diagram
This section outlines the moving parts required to invoke a service. Each service has a small family of helper interfaces and classes. Some of these classes, such as the
service proxy, are automatically generated behind the scenes and you generally will never realize they exist. The pattern for helper classes is identical for every service that
you implement, so it is a good idea to spend a few moments to familiarize yourself with the terminology and purpose of each layer in server call processing. If you are familiar
with traditional remote procedure call (RPC) mechanisms, you will recognize most of this terminology already. 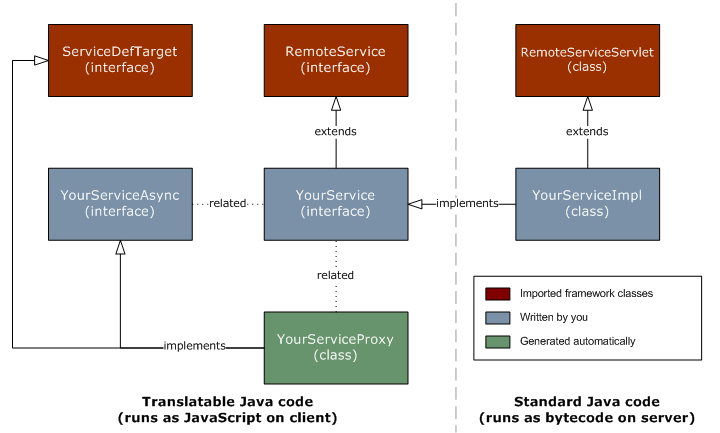
Creating Services
In order to define your RPC interface, you need to:
- Define an interface for your service that extends RemoteService and lists all your RPC methods.
- Define a class to implement the server-side code that extends RemoteServiceServlet and implements the interface you created above.
- Define an asynchronous interface to your service to be called from the client-side code.
Synchronous Interface
To begin developing a new service interface, create a client-side Java interface that extends the RemoteService tag interface.
package com.example.foo.client;

import com.google.gwt.user.client.rpc.RemoteService;

public interface MyService extends RemoteService {
  public String myMethod(String s);
}
This synchronous interface is the definitive version of your service's specification. Any implementation of this service on the server-side must extend RemoteServiceServlet and implement this service interface.
package com.example.foo.server;

import com.google.gwt.user.server.rpc.RemoteServiceServlet;
import com.example.foo.client.MyService;


public class MyServiceImpl extends RemoteServiceServlet implements
    MyService {

  public String myMethod(String s) {
    // Do something interesting with 's' here on the server.
    return s;
  }
}
Tip: It is not possible to call this version of the RPC directly from the client. You must create an asynchronous interface to all your services as shown below.
Asynchronous Interfaces
Before you can actually attempt to make a remote call from the client, you must create another client interface, an asynchronous one, based on your original service interface. Continuing with the example above, create a new interface in the client subpackage:
package com.example.foo.client;

interface MyServiceAsync {
  public void myMethod(String s, AsyncCallback<String> callback);
}
The nature of asynchronous method calls requires the caller to pass in a callback object that can be notified when an asynchronous call completes, since by definition the caller cannot be blocked until the call completes. For the same reason, asynchronous methods do not have return types; they generally return void. Should you wish to have more control over the state of a pending request, return Request instead. After an asynchronous call is made, all communication back to the caller is via the passed-in callback object.
Naming Standards
Note the use of the suffix Async and argument referencing the AsyncCallback class in the examples above. The relationship between a service interface and its
asynchronous counterpart must follow certain naming standards. The GWT compiler depends on these naming standards in order to generate the proper code to implement RPC.
- A service interface must have a corresponding asynchronous interface with the same package and name with the Async suffix appended. For example, if a service interface is
named
com.example.cal.client.SpellingService, then the asynchronous interface must be calledcom.example.cal.client.SpellingServiceAsync. - Each method in the synchronous service interface must have a corresponding method in the asynchronous service interface with an extra AsyncCallback parameter as the last argument.
See AsyncCallback for additional details on how to implement an asynchronous callback.
Implementing Services
Every service ultimately needs to perform some processing to order to respond to client requests. Such server-side processing occurs in the service implementation, which is based on the well-known servlet architecture. A service implementation must extend RemoteServiceServlet and must implement the associated service interface. Note that the service implementation does not implement the asynchronous version of the service interface.
Every service implementation is ultimately a servlet, but rather than extending HttpServlet, it extends RemoteServiceServlet instead. RemoteServiceServlet automatically handles serialization of the data being passed between the client and the server and
invoking the intended method in your service implementation.
Testing Services During Development
GWT development mode includes an embedded version of Jetty which acts as a development-time servlet container for testing. This allows you to debug both server-side code and
client-side code when you run your application in development mode using a Java debugger. To automatically load your service implementation, configure your servlet in your
web.xml.
For example, suppose you have a module com.example.foo.Foo, and you define an RPC interface com.example.foo.client.MyService, annotated with
@RemoteServiceRelativePath("myService"). You then implement a servlet for the interface you created for com.example.foo.client.MyService with the class
com.example.foo.server.MyServiceImpl which extends RemoteServiceServlet. Finally, you add the following lines to your web.xml:
<!-- Example servlet loaded into servlet container -->
<servlet>
  <servlet-name>myServiceImpl</servlet-name>
  <servlet-class>
    com.example.foo.server.MyServiceImpl
  </servlet-class>
</servlet>
<servlet-mapping>
  <servlet-name>myServiceImpl</servlet-name>
  <url-pattern>/com.example.foo.Foo/myService</url-pattern>
</servlet-mapping>
Take a look at the value in url-pattern. The first part must match the name of your GWT module. If your module has a rename-to attribute, you would use the
renamed value instead; either way it must match the actual subdirectory within your war directory where your GWT module lives (the module base URL). The second part must match the
value you specified in the RemoteServiceRelativePath annotation you annotated com.example.foo.client.MyService with.
When testing out both the client-side and server-side code in development mode, make sure to place a copy of the gwt-servlet.jar into your war/WEB-INF/lib directory,
and make sure your Java output directory is set to war/WEB-INF/classes. Otherwise the embedded Jetty server will not be able to load your servlet properly.
Common Pitfalls
Here are some commonly seen errors trying to get RPC running:
- When you start development mode, you see a
ClassNotFoundExceptionexception on the console, and the embedded server returns an error. This most likely means that the class referenced by the servlet element in your GWT module is not inwar/WEB-INF/classes. Be sure to compile your server classes into this location. If you are using an Antbuild.xmlgenerated by webAppCreator, it should do this for you automatically. - When you start development mode, you see a
NoClassDefFoundError: com/google/gwt/user/client/rpc/RemoteServiceexception on the console, and the embedded server returns an error. This most likely means you forgot to copygwt-servlet.jarintowar/WEB-INF/lib. If you are using an Antbuild.xmlgenerated by webAppCreator, it should do this for you automatically. Later on, if you need additional server-side libraries, you will need to add copies of those libraries intowar/WEB-INF/libalso. - When running your RPC call, development mode displays an exception
NoServiceEntryPointSpecifiedException: Service implementation URL not specified. This error means that you did not specify a@RemoteServiceRelativePathin your service interface, and you also did not manually set target path by calling ServiceDefTarget.setServiceEntryPoint(). - If invoking your RPC call fails with a 404 StatusCodeException, your web.xml may be misconfigured. Make sure you specified a
@RemoteServiceRelativePathand that the<url-pattern>specified in yourweb.xmlmatches this value, prepended with the location of your GWT output directory within the war directory.
Deploying Services Into Production
If development mode works correctly, and you've compiled your application with the GWT compiler and tested that production mode works correctly, you should be able to deploy the contents of your war directory into any servlet container that is appropriate for your application. See the example deployment in this guide for an example of how to deploy to a servlet container.
Actually Making a Call
The process of making an RPC from the client always involves the same steps:
- Instantiate the service interface using GWT.create().
- Create an asynchronous callback object to be notified when the RPC has completed.
- Make the call.
Example
Suppose you want to call a method on a service interface defined as follows:
// The RemoteServiceRelativePath annotation automatically calls setServiceEntryPoint()
@RemoteServiceRelativePath("email")
public interface MyEmailService extends RemoteService {
  void emptyMyInbox(String username, String password);
}
Its corresponding asynchronous interface will look like this:
public interface MyEmailServiceAsync {
  void emptyMyInbox(String username, String password,
      AsyncCallback<Void> callback);
}
The client-side call will look like this:
public void menuCommandEmptyInbox() {
  // (1) Create the client proxy. Note that although you are creating the
  // service interface proper, you cast the result to the asynchronous
  // version of the interface. The cast is always safe because the
  // generated proxy implements the asynchronous interface automatically.
  //
  MyEmailServiceAsync emailService = (MyEmailServiceAsync) GWT.create(MyEmailService.class);

  // (2) Create an asynchronous callback to handle the result.
  //
  AsyncCallback callback = new AsyncCallback() {
    public void onSuccess(Void result) {
      // do some UI stuff to show success
    }

    public void onFailure(Throwable caught) {
      // do some UI stuff to show failure
    }
  };

  // (3) Make the call. Control flow will continue immediately and later
  // 'callback' will be invoked when the RPC completes.
  //
  emailService.emptyMyInbox(fUsername, fPassword, callback);
}
It is safe to cache the instantiated service proxy to avoid creating it for subsequent calls. For example, you can instantiate the service proxy in the module's
onModuleLoad() method and save the resulting instance as a class member.
public class Foo implements EntryPoint {
      private MyEmailServiceAsync myEmailService = (MyEmailServiceAsync) GWT.create(MyEmailService.class);

      public void onModuleLoad() {
        // ... other initialization
      }

      /**
       * Make a GWT-RPC call to the server.  The myEmailService class member
       * was initialized when the module started up.
       */
      void sendEmail (String message) {
          myEmailService.sendEmail(message, new AsyncCallback<String>() {

            public void onFailure(Throwable caught) {
              Window.alert("RPC to sendEmail() failed.");
            }

            public void onSuccess(String result) {
              label.setText(result);
            }
          });
      }
    }
Serializable Types
GWT supports the concept of serialization, which means allowing the contents of a data object to be moved out of one piece of running code and either transmitted to another application or stored outside the application for later use. GWT RPC method parameters and return types must be transmitted across a network between client and server applications and therefore they must be serializable.
Serializable types must conform to certain restrictions. GWT tries really hard to make serialization as painless as possible. While the rules regarding serialization are subtle, in practice the behavior becomes intuitive very quickly.
Tip: Although the terminology is very similar, GWT's concept of "serializable" is slightly different than serialization based on the standard Java interface Serializable. All references to serialization are referring to the GWT concept. For some background, see the FAQ topic Does the GWT RPC system support the use of java.io.Serializable?
A type is serializable and can be used in a service interface if one of the following is true:
- The type is primitive, such as
char,byte,short,int,long,boolean,float, ordouble. - The type an instance of the
String,Date, or a primitive wrapper such asCharacter,Byte,Short,Integer,Long,Boolean,Float, orDouble. - The type is an enumeration. Enumeration constants are serialized as a name only; none of the field values are serialized.
- The type is an array of serializable types (including other serializable arrays).
- The type is a serializable user-defined class.
- The type has at least one serializable subclass.
- The type has a Custom Field Serializer
The class java.lang.Object is not serializable, therefore you cannot expect that a collection of Object types will be
serialized across the wire. As of GWT 1.5, most use cases can utilize Java
generics to replace the use of Object instances. This is strongly encouraged,
both to reduce client code size and to provide security against certain denial
of service attacks.
Serializable User-defined Classes
A user-defined class is serializable if all of the following apply:
- It is assignable to IsSerializable or Serializable, either because it directly implements one of these interfaces or because it derives from a superclass that does
- All non-
final, non-transientinstance fields are themselves serializable, and - As of GWT 1.5, it must have a default (zero argument) constructor (with any access modifier) or no constructor at all.
The transient keyword is honored, so values in transient fields are not exchanged during RPCs. Fields that are declared final are also not exchanged during
RPCs, so they should generally be marked transient as well.
Polymorphism
GWT RPC supports polymorphic parameters and return types. To make the best use of polymorphism, however, you should still try to be as specific as your design allows when defining service interfaces. Increased specificity allows the compiler to do a better job of removing unnecessary code when it optimizes your application for size reduction. Furthermore, server-side deserialization uses generic type information extracted from method signatures to verify that the values it is deserializing are of the correct type (to prevent some security attacks).
Raw Types
Collection classes such as java.util.Set and
java.util.List are tricky because they operate in terms of
Object instances. To make collections serializable, you should
specify the particular type of objects they are expected to contain through
normal type parameters (for example, Map<Foo,Bar> rather than
just Map). If you use raw collections or maps you will get bloated
code and be vulnerable to denial of service attacks.
Serializing Enhanced Classes
Server-side persistence APIs, such as Java Data Objects (JDO) and the Java Persistence API allow server-side code to store Java objects in a persistent data store. When objects are attached to the data store, changes to the object field values are reflected in the data store and remain available even after the object is destroyed or the Java VM is restarted.
A number of persistence APIs are commonly implemented by passing the class source code or bytecode through a tool known as an "enhancer." Enhancers may add additional static or instance fields to the class definition in order to implement the persistence features. Note that these enhancements are relevant on the server-side only; GWT does not provide persistence for client code. However, the use of server-side enhancement causes class definitions to differ between the client and server, since the enhancer is run only on the server. Due to these differences, previous versions of GWT were unable to perform RPC on enhanced classes.
As of GWT version 2.0, some common forms of persistence are now handled by the GWT RPC mechanism. GWT considers a class to be enhanced if any of the following are true:
- The class is annotated with a JDO
javax.jdo.annotations.PersistenceCapableannotation withdetachable=true. - The class is annotated with a JPA
javax.persistence.Entityannotation.* The fully-qualified class name is listed as one of the values of therpc.enhancedClassesconfiguration property in a.gwt.xmlmodule file that is part of the application.
The GWT RPC mechanism for enhanced classes makes several assumptions regarding the persistence implementation:
- The object must be in a detached state (that is, changes to its fields must not affect the persistent store, and vice versa) at the time it is passed to or returned from a method of a
RemoteService. - Enhanced fields that are neither static nor transient must be serializable using the ordinary Java serialization mechanism.
- If the persistence implementation requires changes to an enhanced instance field to have additional side effects (for example, if static fields need to be updated at the same time), a suitably named setter method (as described below) must exist for the instance field.
When transmitting an enhanced object from server to client, the normal GWT RPC mechanism is used for the non-enhanced fields. Non-transient, non-static fields that exist on the server but not the client are serialized on the server using Java serialization, and the field names and values are combined into a single encoded value which is passed to the client. The client stores this encoded value, but does not make use of it except when transmitting the object back to the server.
When an enhanced object is transmitted from client to server, the encoded value (if present) is sent to the server, where it is decoded into its separate field names and values. For each field 'xxxYyy', if a setter method named 'setXxxYyy' exists (note capitalization of the first letter following 'set'), it is called with the field value as its argument. Otherwise, the field is set directly.
Custom Serialization
Classes with specific serialization requirements may take advantage of custom field serializers. Examples include classes with constructors that require arguments, or classes where data is more efficiently serialized in a form that differs from the class structure. Among existing GWT classes, most Java collection classes have custom serializers, as do some logging and exception handling classes.
The custom field serializer for class Foo must be named
Foo_CustomFieldSerializer, and must be located in the same
package as the class that it serializes. In cases where it is not possible to
put the serializer in the appropriate package, the serializer may be placed in
the specific GWT serializer package, com.google.gwt.user.client.rpc.core.
For example, the custom field serializer for java.util.HashMap is
com.google.gwt.user.client.rpc.core.java.util.HashMap_CustomFieldSerializer.
Custom field serializers should extend the
CustomFieldSerializer<T> class, with the class that is being
serialized as the type parameter. For example:
public final class HashMap_CustomFieldSerializer extends CustomFieldSerializer<HashMap>
All custom field serializer classes must implement the serializeInstance and deserializeInstance methods. Optionally, a class may override the default instantiateInstance and hasCustomInstantiateInstance methods if it cannot use default instantiation (for example, it does not have a default constructor) or wants custom instantiation (for example, to instantiate an immutable object). See the built-in custom serializers for examples of these methods.
Type Checked Custom Serialization
Some Denial of Service attacks exploit the fact that method parameters in an RPC message must be deserialized before the method is invoked, and hence before an exception can be thrown by the method for invalid parameters. As of GWT version 2.4, support is provided for server-side type checking of method parameters as they are deserialized. The correct use of type checking can protect against parameter substitution attacks.
To support type checking, server-specific versions of custom field serializers
must be provided. The custom serializer class must be in a server package with
the same qualified name as the client serializer, with "client"
replaced by "server". The actual serializer class for Foo
must be named Foo_ServerCustomFieldSerializer.
As an example, the client serializer for the method
test.com.google.gwt.user.client.rpc.TypeCheckedGenericClass is
test.com.google.gwt.user.client.rpc.TypeCheckedGenericClass_CustomFieldSerializer
and the server type-checked version is
test.com.google.gwt.user.server.rpc.TypeCheckedGenericClass_ServerCustomFieldSerializer.
Server custom field serializers should extend the
ServerCustomFieldSerializer<T> class, with the class that is being
serialized as the type parameter. For example:
public final class HashMap_ServerCustomFieldSerializer extends ServerCustomFieldSerializer<HashMap>
All server custom field serializer classes must implement the
client-side
CustomFieldSerializer
See the existing serializers, such as HashMap_ServerCustomFieldSerializer, for examples of type checking.
Handling Exceptions
Making RPCs opens up the possibility of a variety of errors. Networks fail, servers crash, and problems occur while processing a server call. GWT lets you handle these conditions in terms of Java exceptions. RPC-related exceptions fall into two categories: checked exceptions and unchecked exceptions.
Keep in mind that any custom exceptions that you want to define, like any other piece of client-side code, must only be composed of types supported by GWT's emulated JRE library.
Checked Exceptions
Service interface methods support throws declarations to indicate which exceptions may be thrown back to
the client from a service implementation. Callers should implement AsyncCallback.onFailure(Throwable) to check for any exceptions specified in the service interface.
Unexpected Exceptions
InvocationException
An RPC may not reach the service implementation at all. This can happen for many reasons: the network may be
disconnected, a DNS server might not be available, the HTTP server might not be listening, and so on. In this case, an InvocationException is passed to your
implementation of AsyncCallback.onFailure(Throwable). The class is called InvocationException because the problem was with the invocation attempt itself rather than with
the service implementation.
An RPC can also fail with an invocation exception if the call does reach the server, but an undeclared exception occurs during normal processing of the call. There are many
reasons such a situation could arise: a necessary server resource, such as a database, might be unavailable, a NullPointerException could be thrown due to a bug in the
service implementation, and so on. In these cases, a InvocationException is thrown in application code.
IncompatibleRemoteServiceException
Another type of failure can be caused by an incompatibility between the client and the server. This most commonly occurs when a change to a service implementation is deployed to a server but out-of-date clients are still active. For more details please see IncompatibleRemoteServiceException.
When the client code receives an IncompatibleRemoteServiceException, it should ultimately attempt to refresh the browser in order to pick up the latest client.
Architectural Perspectives
There are various ways to approach services within your application architecture. Understand first of all that GWT RPC services are not intended to replace J2EE servers, nor are they intended to provide a public web service (e.g. SOAP) layer for your application. GWT RPCs, fundamentally, are simply a method of "getting from the client to the server." In other words, you use RPCs to accomplish tasks that are part of your application but that cannot be done on the client computer.
Architecturally, you can make use of RPC two alternative ways. The difference is a matter of taste and of the architectural needs of your application.
Simple Client/Server Deployment
The first and most straightforward way to think of service definitions is to treat them as your application's entire back end. From this perspective, client-side code is your "front end" and all service code that runs on the server is "back end." If you take this approach, your service implementations would tend to be more general-purpose APIs that are not tightly coupled to one specific application. Your service definitions would likely directly access databases through JDBC or Hibernate or even files in the server's file system. For many applications, this view is appropriate, and it can be very efficient because it reduces the number of tiers.
Multi-Tier Deployment
In more complex, multi-tiered architectures, your GWT service definitions could simply be lightweight gateways that call through to back-end server environments such as J2EE servers. From this perspective, your services can be viewed as the "server half" of your application's user interface. Instead of being general-purpose, services are created for the specific needs of your user interface. Your services become the "front end" to the "back end" classes that are written by stitching together calls to a more general-purpose back-end layer of services, implemented, for example, as a cluster of J2EE servers. This kind of architecture is appropriate if you require your back-end services to run on a physically separate computer from your HTTP server.
Deploying RPC
The GWT development mode embedded web server is only intended for debugging your web app. Once your web app is ready for deployment, it is time to deploy to a production server. If your web app consists only of static content, pretty much any web server will do. However, most GWT web apps will use RPC and Java servlets. For these kinds of applications, you will need to select a servlet container (also called a web container or web engine) to run the backend. GWT does not provide a servlet container to use in production, but there are many different products available. The following lists just a few commercial and non-commercial offerings:
In the examples below, we'll show how to deploy your server-side components to a production server using Apache HTTPD and Apache Tomcat as a web engine. Although there are many different implementations of web servers and servlet containers, the Servlet API Specification defines a standard structure for project directories which most web engines follow, and as of 1.6, GWT's native output format follows this specification.
Tip: For the latest servlet specification documentation see the Java Community Process website. It will describe the general workings of the servlet and the conventions used in configuring your servlets for deployment.
Simple Example with Apache Tomcat
Before you get started, make sure your application works correctly in development mode.
The simplest way to deploy your application is to use a single server for both your static content and your servlet classes. If you created your project with webAppCreator, you
can simply run ant war in your project directory. The Ant build.xml file should do the following things automatically:
- Copy any necessary libraries into
war/WEB-INF/lib. You may need to update yourbuild.xmlfile if you've added additional library dependencies beyondgwt-servlet.jar. - Compile your Java source files into
war/WEB-INF/classes. This is necessary to run your server code on the web server. - Run the GWT compiler on your GWT module. This produces all of the GWT output files you need.
- Zip up the contents of your war directory into a
.warfile.
Now just copy your .war file into Tomcat's /webapps folder. If you have default configuration settings it should automatically unzip the .war file.
If Tomcat is in its default configuration to run on port 8080, you should be able to run your application by entering the url
http://<hostname>:8080/MyApp/MyApp.html into your web browser.
If you encounter any problems, take look in the Tomcat log file, which can be found in the logs directory of your Tomcat installation. If your web pages display but
the RPC calls don't seem to be going through, try turning on access logging on Tomcat. You may find that the URL used by the client side has not been registered by Tomcat, or that
there is a misconfiguration between the URL path set in the setServiceEntryPoint(URL) call when declaring your RPC service and the <url-pattern> URL
mapping the web.xml file.
Using Tomcat with Apache HTTPD and a proxy
The above example is a good way to test your application from client to server, but may not be the best production setup. For one, the Jakarta/Tomcat server is not the fastest web server for static files. Also, you may already have a web infrastructure setup for serving static content that you would like to leverage. The following example will show you how to split the web engine deployment from the static content.
If you look at the war directory of a built web application, you'll notice two kinds of files:
- Everything other than the
WEB-INF/directory (and subdirectories) is static content. - The contents of the
WEB-INF/directory contain server configuration and code.
Once you've built your web application, copy the contents of the war directory except for WEB-INF/ directory into your apache configuration's document root. We
will call that directory /var/www/doc/MyApp and the resulting URL is http://www.example.com/MyApp/MyApp.html. (An easier method might be to just copy the entire
war contents and then delete WEB-INF/ out of the destination.)
To setup your Tomcat server, just deploy the entire war, including both kinds of content. The reason for including static content is that servlets may need to use ServletContext.getResource() to access static content programmatically. This is always true for GWT RPC servlets, which need to load a generated serialization policy file.
Example
Let's assume that the Tomcat server is on a different host. In this case, there is going to be a problem. Browsers' Single Origin Policy (SOP) will prevent connections to ports or machines that differ from the original URL. The strategy we are going to use to satisfy the SOP is to configure Apache to proxy a URL to another URL.
Specific directions for configuring Apache and Tomcat for such a proxy setup are at the Apache website. The general idea is to setup Apache to redirect ONLY requests to your sevlets. That way Apache will serve all the static content, and your Tomcat server will only be used for service calls. For this example, assume that:
- Your Apache server is running on
www.example.com - Your Tomcat server is running on
servlet.example.com:8080 - Your GWT module has a
<rename-to="myapp"> - You have one RPC servlet, mapped into
/myapp/myService
The idea is to have Apache proxy requests to the servlet to the other server such that:
http://www.example.com/MyApp/myapp/myService --> http://servlet.example.com:8080/MyApp/myapp/myService
The following Apache configuration sets up such a rule using a Proxy:
ProxyPass        /MyApp/myapp/myService  http://servlet.example.com:8080/MyApp/myapp/myService
ProxyPassReverse /MyApp/myapp/myService  http://servlet.example.com:8080/MyApp/myapp/myService
To verify this is working, use a web browser to hit both http://www.example.com/MyApp/myapp/myService and
http://servlet.example.com:8080/MyApp/myapp/myService. You should get the same result in both cases (typically a 405: HTTP method GET is not supported by this URL, which is good). If you get something different hitting the second URL, you may have a configuration issue.
- If you get a 404, there is most likely an error in the left hand side of your URL mapping.
- If you get a "Bad Gateway", there is most likely an error in the right hand side of your URL mapping.
- If you get a 403 permission error, check the Apache configuration files for
<Proxy>tags to see if the permissions are wrong. You may need to add a section like this:
<Proxy \*>
     Order deny,allow
     Allow from all
   </Proxy>
Other Deployment Methods
It should be mentioned that these are just two examples of deployment scenarios. There are many ways to configure your application for deployment:
- Some web engines take special directives in
web.xmlthat need to be taken into consideration. - Some web servers have optimized ways to route servlet calls to a servlet engine (e.g. mod_jk on Apache)
- Some web servers and web engines have facilities for replication so you can load balance your servlet across many nodes.
Tip: You can also use a real production server while debugging in development mode. This can be useful if you are adding GWT to an existing application, or if your server-side requirements have become more than the embedded web server can handle. See this article on how to use an external server in development mode.
Making HTTP requests
If your GWT application needs to communicate with a server, but you can't use Java servlets on the backend — or if you simply prefer not to use RPC — you can still perform HTTP requests manually. GWT contains a number of HTTP client classes that simplify making custom HTTP requests to your server and optionally processing a JSON- or XML-formatted response.
GWT contains a set of HTTP client classes that allow your application to make generic HTTP requests.
Using HTTP in GWT
Making HTTP requests in GWT works much like it does in any language or framework, but there are a couple of important differences you should be aware of.
First, because of the single-threaded execution model of most web browsers, long synchronous operations such as server calls can cause a JavaScript application's interface (and sometimes the browser itself) to become unresponsive. To prevent network or server communication problems from making the browser "hang", GWT allows only asynchronous server calls. When sending an HTTP request, the client code must register a callback method that will handle the response (or the error, if the call fails). For more information about the exclusion of synchronous server connections, you may want to check out this FAQ article.
Second, because GWT applications run as JavaScript within a web page, they are subject to the browser's same origin policy (SOP). SOP prevents client-side JavaScript code from interacting with untrusted (and potentially harmful) resources loaded from other websites. In particular, SOP makes it difficult (although not impossible) to send HTTP requests to servers other than the one that served the HTML host page into which your GWT module is loaded.
HTTP client types
To use the HTTP types in your application,
you'll need to first inherit the GWT HTTP module by adding the following <inherits> tag to your module XML file:
<inherits name="com.google.gwt.http.HTTP" />
RequestBuilder is the core class you'll need for constructing and sending HTTP requests. Its constructor has parameters for specifying the HTTP method of the request (GET, POST, etc.) and the URL (the URL utility class is handy for escaping invalid characters). Once you have a RequestBuilder object, you can use its methods to set the username, password, and timeout interval. You can also set any number of headers in the HTTP request.
Once the HTTP request is ready, call the server using the sendRequest(String, RequestCallback) method. The RequestCallback argument you pass will handle the response or the error that results. When a request completes normally, your onResponseReceived(Request, Response) method is invoked. Details of the response (for example, status code, HTTP headers, and response text) can be retrieved from the Response argument. Note that the onResponseReceived(Request, Response) method is called even if the HTTP status code is something other than 200 (success). If the call does not complete normally, the onError(Request, Throwable) method gets called, with the second parameter describing the type error that occurred.
As noted before, all HTTP calls in GWT are asynchronous, so the code following the call to sendRequest(String, RequestCallback) will be executed immediately, not after the server responds to the HTTP request. You can use the Request object that is returned from sendRequest(String, RequestCallback) to monitor the status of the call, and cancel it if necessary.
Here's a brief example of making an HTTP request to a server:
import com.google.gwt.http.client.*;
...

String url = "http://www.myserver.com/getData?type=3";
RequestBuilder builder = new RequestBuilder(RequestBuilder.GET, URL.encode(url));

try {
  Request request = builder.sendRequest(null, new RequestCallback() {
    public void onError(Request request, Throwable exception) {
       // Couldn't connect to server (could be timeout, SOP violation, etc.)
    }

    public void onResponseReceived(Request request, Response response) {
      if (200 == response.getStatusCode()) {
          // Process the response in response.getText()
      } else {
        // Handle the error.  Can get the status text from response.getStatusText()
      }
    }
  });
} catch (RequestException e) {
  // Couldn't connect to server
}
Processing the response
Once you receive the response from the server using Response.getText(), it's up to you to process it. If your response is encoded in XML or JSON, you can use the XML library and the JSON library or overlay types, respectively, to process it.
Getting Used to Asynchronous Calls
Using the AsyncCallback interface is new to many developers. Code is not necessarily executed sequentially, and it forces developers to handle situations where a server call is in progress but has not completed. Despite these seeming drawbacks, the designers of GWT felt it was an essential part of creating usable interfaces in AJAX for several reasons:
- The JavaScript engine in most browsers is singly threaded, meaning that:
- The JavaScript engine will hang while waiting for a synchronous RPC call to return.
- Most browsers will popup a dialog if any JavaScript entry point takes longer than a few moments.
- A server could be inaccessible or otherwise non responsive. Without an asynchronous mechanism, the application could be left waiting on a server call to return indefinitely.
- Asynchronous mechanisms allow server calls to run in parallel with logic inside the application, shortening the overall response time to the user.
- Asynchronous mechanisms can service multiple server calls in parallel.
Browser mechanics aside, asynchronous RPC gives your application the ability to achieve true parallelism in your application, even without multi-threading. For example, suppose your application displays a large table containing many widgets. Constructing and laying out all those widgets can be time consuming. At the same time, you need to fetch data from the server to display inside the table. This is a perfect reason to use asynchronous calls. Initiate an asynchronous call to request the data immediately before you begin constructing your table and its widgets. While the server is fetching the required data, the browser is executing your user interface code. When the client finally receives the data from the server, the table has been constructed and laid out, and the data is ready to be displayed.
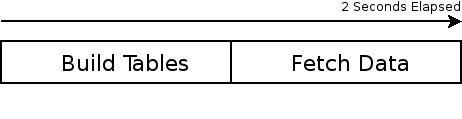
To give you an idea of how effective this technique can be, suppose that building the table takes one second and fetching the data takes one second. If you make the server call synchronously, the whole process will require at least two seconds.
But if you fetch the data asynchronously, the whole process still takes just one second, even though you are doing two seconds' worth of work.
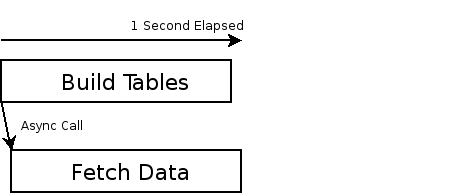
Tip: Most browsers restrict the number of outgoing network connections to two at a time, restricting the amount of parallelism you can expect from multiple simultaneous RPCs.
The hardest thing to get used to about asynchronous calls is that the calls are non-blocking, however, Java inner classes go a long way toward making this manageable. Consider
the following implementation of an asynchronous call adapted from the Dynamic Table sample
application. It uses a slightly different syntax to define the required interface for the AsyncCallback object that is the last
parameter to the getPeople RPC call:
// This code is called before the RPC starts
 //
  if (startRow == lastStartRow) {
    ...
  }

  // Invoke the RPC call, implementing the callback methods inline:
  //
  calService.getPeople(startRow, maxRows, new AsyncCallback<Person[]>() {

    // When the RPC returns, this code will be called if the RPC fails
    public void onFailure(Throwable caught) {
       statusLabel.setText("Query failed: " + caught.getMessage());
       acceptor.failed(caught);
    }

    // When the RPC returns, this code is called if the RPC succeeds
    public void onSuccess(Person[] result) {
      lastStartRow = startRow;
      lastMaxRows = maxRows;
      lastPeople = result;
      pushResults(acceptor, startRow, result);
      statusLabel.setText("Query reutrned " + result.length + " rows.");
    }
  });

  // The above method call will not block, but return immediately.
  // The following code will execute while the RPC is in progress,
  // before either of onFailure() or onSuccess() are executed.
  //
  statusLabel.setText("Query in progress...");
  ...
The important issue to understand is that that the code that follows the RPC call invocation will be executed while the actual round trip to the server is still in progress.
Although the code inside the onSuccess() method is defined inline with the call, it will not be executed until both the calling code returns back to the JavaScript main
loop, and the result message from the server returns.
Direct-Eval RPC
This feature did not work out as planned, and the GWT team strongly discourages its use. Try the Request Factory feature when you have non-trivial server-domain objects.