Organizing Projects
GWT projects can be organized in a variety of ways. However, particular conventions are encouraged to make it easy to identify which code is intended to run on the client browser, the server, or both.
This section describes the fundamentals of project organization with GWT as well as the recommended conventions.
- HTML Host Pages
- Standard Directory and Package Layout
- Modules: Units of configuration
- Module XML files
- How do I know which GWT modules I need to inherit?
- Automatic Resource Inclusion
- Filtering Public and Source Packages
- The Bootstrap Sequence
HTML Host Pages
GWT modules are stored on a web server as a set of JavaScript and related files. In order to run the module, it must be loaded from a web page of some sort. Any HTML page can
include a GWT application via a SCRIPT tag. This HTML page is referred to as a host page from the GWT application's point of view. A typical HTML host page for an
application written with GWT from scratch might not include any visible HTML body content at all. The example below shows how to embed a GWT application that will use the entire
browser window.
<html>
  <head>

    <!-- Properties can be specified to influence deferred binding -->
    <meta name='gwt:property' content='locale=en_UK'>

    <!-- Stylesheets are optional, but useful -->
    <link rel="stylesheet" href="Calendar.css">

    <!-- Titles are optional, but useful -->
    <title>Calendar App</title>

  </head>
  <body>

    <!-- This script tag is what actually loads the GWT module.  The -->
    <!-- 'nocache.js' file (also called a "selection script") is     -->
    <!-- produced by the GWT compiler in the module output directory -->
    <!-- or generated automatically in development mode.             -->
    <script language="javascript" src="calendar/calendar.nocache.js"></script>

    <!-- Include a history iframe to enable full GWT history support -->
    <!-- (the id must be exactly as shown)                           -->
    <iframe src="javascript:''" id="__gwt_historyFrame" style="width:0;height:0;border:0"></iframe>

  </body>
 </html>
Note that the body of the page contains only a SCRIPT tag and an IFRAME tag. It is left to the GWT application to then fill in all the visual content.
But GWT was designed to make it easy to add GWT functionality to existing web applications with only minor changes. It is possible to allow the GWT module to selectively insert
widgets into specific places in an HTML page. To accomplish this, use the id attribute in your HTML tags to specify a unique identifier that your GWT code will use to
attach widgets to that HTML element. For example:
<body>
    <!-- ... other sample HTML omitted   -->
    <table align=center>
      <tr>
        <td id="slot1"></td>
        <td id="slot2"></td>
      </tr>
    </table>
  </body>
Notice that the td tags include an id attribute associated with them. This attribute is accessible through the DOM class. You can easily attach
widgets using the method RootPanel.get(). For example:
final Button button = new Button("Click me");
    final Label label = new Label();

    ...

    RootPanel.get("slot1").add(button);
    RootPanel.get("slot2").add(label);
In this manner, GWT functionality can be added as just a part of an existing page, and changing the application layout can be done in plain HTML. The I18N sample uses
this technique heavily.
A host HTML page does not have to be static content. It could also be generated by a servlet, or by a JSP page.
Standard Directory and Package Layout
GWT projects are overlaid onto Java packages such that most of the configuration can be inferred from the classpath and the module definitions.
Guidelines
If you are not using the Command-line tools to generate your project files and directories, here are some guidelines to keep in mind when organizing your code and creating Java packages.
- Under the main project directory create the following directories:
-
- src folder - contains production Java source
- war folder - your web app; contains static resources as well as compiled output
- test folder - (optional) JUnit test code would go here
- Within the src package, create a project root package, and within that create a client package.
- If you have server-side code, also create a server package to differentiate between the client-side code (which is translated into JavaScript) from the server-side code (which is not).
- Within the project root package, place one or more module definitions.
- In the war directory, place any static resources (such as the host page, style sheets, or images).
- Within the client and server packages, you are free to organize your code into any subpackages you require.
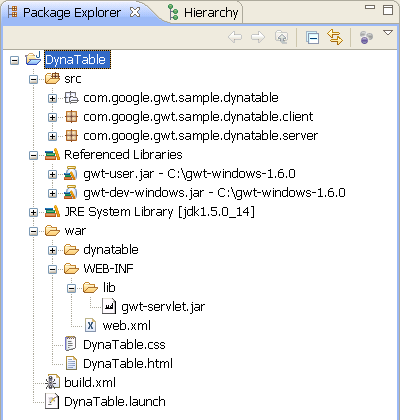
Example: GWT standard package layout
For example, all the files for the "DynaTable" sample are organized in a main project directory also called "DynaTable".
- Java source files are in the directory:
DynaTable/src/com/google/gwt/sample/dynatable - The module is defined in the XML file:
DynaTable/src/com/google/gwt/sample/dynatable/DynaTable.gwt.xml - The project root package is:
com.google.gwt.sample.dynatable - The logical module name is:
com.google.gwt.sample.dynatable.DynaTable
The src directory
The src directory contains an application's Java source files, the module definition, and external resource files.
| Package | File | Purpose |
|---|---|---|
com.google.gwt.sample.dynatable |
The project root package contains module XML files. | |
com.google.gwt.sample.dynatable |
DynaTable.gwt.xml |
Your application module. Inherits com.google.gwt.user.User and adds an entry point class, com.google.gwt.sample.dynatable.client.DynaTable. |
com.google.gwt.sample.dynatable.public |
Static resources that are loaded programmatically by GWT code. Files in the public directory are copied into the same directory as the GWT compiler output. | |
com.google.gwt.sample.dynatable.public |
logo.gif |
An image file available to the application code. You might load this file programmatically using this URL: GWT.getModuleBaseForStaticFiles() + "logo.gif". |
com.google.gwt.sample.dynatable.client |
Client-side source files and subpackages. | |
com.google.gwt.sample.dynatable.client |
DynaTable.java |
Client-side Java source for the entry-point class. |
com.google.gwt.sample.dynatable.client |
SchoolCalendarService.java |
An RPC service interface. |
com.google.gwt.sample.dynatable.server |
Server-side code and subpackages. | |
com.google.gwt.sample.dynatable.server |
SchoolCalendarServiceImpl.java |
Server-side Java source that implements the logic of the service. |
The war directory
The war directory is the deployment image of your web application. It is in the standard expanded war format recognized by a variety of Java web servers, including Tomcat, Jetty, and other J2EE servlet containers. It contains a variety of resources:
- Static content you provide, such as the host HTML page
- GWT compiled output
- Java class files and jar files for server-side code
- A web.xml file that configures your web app and any servlets
A detailed description of the war format is beyond the scope of this document, but here are the basic pieces you will want to know about:
| Directory | File | Purpose |
|---|---|---|
DynaTable/war/ |
DynaTable.html |
A host HTML page that loads the DynaTable app. |
DynaTable/war/ |
DynaTable.css |
A static style sheet that styles the DynaTable app. |
DynaTable/war/dynatable/ |
The DynaTable module directory where the GWT compiler writes output and files on the public path are copied. NOTE: by default this directory would be the long, fully-qualified module name com.google.gwt.sample.dynatable.DynaTable. However, in our GWT module XML file we used the rename-to="dynatable" attribute to shorten it to a nice name. |
|
DynaTable/war/dynatable/ |
dynatable.nocache.js |
The "selection script" for DynaTable. This is the script that must be loaded from the host HTMLto load the GWT module into the page. |
DynaTable/war/WEB-INF |
All non-public resources live here, see the servlet specification for more detail. | |
DynaTable/war/WEB-INF |
web.xml |
Configures your web app and any servlets. |
DynaTable/war/WEB-INF/classes |
Java compiled class files live here to implement server-side functionality. If you're using an IDE set the output directory to this folder. | |
DynaTable/war/WEB-INF/lib |
Any library dependencies your server code needs goes here. | |
DynaTable/war/WEB-INF/lib |
gwt-servlet.jar |
If you have any servlets using GWT RPC, you will need to place a copy of gwt-servlet.jar here. |
The test directory
The test directory contains the source files for any JUnit tests.
| Package | File | Purpose |
|---|---|---|
com.google.gwt.sample.dynatable.client |
Client-side test files and subpackages. | |
com.google.gwt.sample.dynatable.client |
DynaTableTest.java |
Test cases for the entry-point class. |
com.google.gwt.sample.dynatable.server |
Server-side test files and subpackages. | |
com.google.gwt.sample.dynatable.server |
SchoolCalendarServiceImplTest.java |
Test cases for server classes. |
Modules: Units of configuration
Individual units of GWT configuration are called modules. A module bundles together all the configuration settings that your GWT project needs:
- inherited modules
- an entry point application class name; these are optional, although any module referred to in HTML must have at least one entry-point class specified
- source path entries
- public path entries
- deferred binding rules, including property providers and class generators
Modules are defined in XML and placed into your project's package hierarchy. Modules may appear in any package in your classpath, although it is strongly recommended that they appear in the root package of a standard project layout.
Entry-Point Classes
A module entry-point is any class that is assignable to EntryPoint and that can be constructed without parameters. When a module is loaded, every entry point class is instantiated and its EntryPoint.onModuleLoad() method gets called.
Source Path
Modules can specify which subpackages contain translatable source, causing the named package and its subpackages to be added to the source path. Only files found on the source path are candidates to be translated into JavaScript, making it possible to mix client-side and server-side code together in the same classpath without conflict. When module inherit other modules, their source paths are combined so that each module will have access to the translatable source it requires.
The default source path is the client subpackage underneath where the Module XML File is stored.
Public Path
Modules can specify which subpackages are public, causing the named package and its subpackages to be added to the public path. The public path is the place in
your project where static resources referenced by your GWT module, such as CSS or images, are stored. When you compile your application into JavaScript, all the files that can be
found on your public path are copied to the module's output directory. When referencing public resources in client code (for example, setting the URL of an Image widget,
you should construct the URL like this: GWT.getModuleBaseForStaticFiles() + "resourceName.png". When referencing public resources from a Module XML File, just use the relative path within the public folder, the module's base URL will be prepended automatically.
When a module inherits other modules, their public paths are combined so that each module will have access to the static resources it expects.
The default public path is the public subdirectory underneath where the Module XML File is stored.
Defining a module: format of module XML files
Modules are defined in XML files with a file extension of .gwt.xml. Module XML files should reside in your project's root package.
If you are using the standard project structure, your module XML can be as simple as the following example:
<module rename-to="dynatable">
    <inherits name="com.google.gwt.user.User" />
    <entry-point class="com.google.gwt.sample.dynatable.client.DynaTable" />
 </module>
Loading modules
Module XML files are found on the Java classpath. Modules are always referred to by their logical names. The logical name of a module is of the form pkg1.pkg2.ModuleName (although any number of packages may be present). The logical name includes neither the actual file system path nor the file extension.
For example, if the module XML file has a file name of...
~/src/com/example/cal/Calendar.gwt.xml
...then the logical name of the module is:
com.example.cal.Calendar
Renaming modules
The <module> element supports an optional attribute rename-to that causes the compiler to behave as though the module had a different name than the
long, fully-qualified name. Renaming a module has two primary use cases:
- to have a shorter module name that doesn't reflect the actual package structure, this is the most typical and recommended use case
- to create a "working module" to speed up development time by restricting the number of permutations
com.foo.WorkingModule.gwt.xml:
<module rename-to="com.foo.MyModule">
  <inherits name="com.foo.MyModule" />
  <set-property name="user.agent" value="ie6" />
  <set-property name="locale" value="default" />
</module>
When WorkingModule.gwt.xml is compiled, the compiler will produce only an ie6 variant using the default locale; this will speed up development compilations.
The output from the WorkingModule.gwt.xml will be a drop-in replacement for MyModule.gwt.xml because the compiler will generate the output using the alternate
name. (Of course, if com.foo.MyModule was itself renamed, you would just copy its rename-to attribute.)
Dividing code into multiple modules
Creating a second module doesn't necessarily mean that that module must define an entry point. Typically, you create a new module when you want to package up a library of GWT
code that you want to reuse in other GWT projects. An example of this is the Google API Library for GWT (GALGWT), specifically the Gears for GWT API binding. If you download the library and take a look at the gwt-google-apis/com/google/gwt/gears you'll
find the Gears.gwt.xml file for the module which doesn't define an entry point. However, any GWT project that would like to use Gears for GWT will have to inherit the
Gears.gwt.xml module. For example, a module named "Foo" might want to use GALGWT, so in Foo.gwt.xml an <inherits> entry would be needed:
<module>
...
    <inherits name='com.google.gwt.gears.Gears' />
Loading multiple modules in an HTML host page
If you have multiple GWT modules in your application, there are two ways to approach loading them.
- Compile each module separately and include each module with a separate
<script>tag in your HTML host page. - Create a top level module XML definition that includes all the modules you want to include. Compile the top level module to create a single set of JavaScript output.
The first approach may seem the easiest and most obvious. However, the second approach will lead to much better end-user performance. The problem with loading multiple modules is that each module has to be downloaded separately by the end-user's browser. In addition, each module will contain redundant copies of GWT library code and could possibly conflict with each other during event handling. The second approach is strongly recommended.
Controlling compiler output
The GWT compiler separates the act of compiling and packaging its output with the Linker subsystem. It is responsible for the final packaging of the JavaScript code and providing a pluggable bootstrap mechanism for any particular deployment scenario.
For more information, see Linkers
Overriding one package implementation with another
The <super-source> tag instructs the compiler to "re-root" a source path. This is useful for cases where you want to re-use an existing Java API for a GWT
project, but the original source is not available or not translatable. A common reason for this is to emulate part of the JRE not implemented by GWT.
For example, suppose you want implement the UUID class provided by the JRE under java.util. Assume your project's module file is
com/example/myproject/MyProject.gwt.xml. Place the source for the UUID class into com/example/myproject/jre/java/util/UUID.java. Then add a line to
MyProject.gwt.xml:
<super-source path="jre" />
This tells the compiler to add all subfolders of com/example/myproject/jre/ to the source path, but to strip off
the path prefix up to and including jre. As a result, com/google/myproject/gwt/jre/java/util/UUID.java will be visible to the compiler as
java/util/UUID.java, which is the intended result.
The GWT project uses this technique internally for the JRE emulation classes provided with GWT. One caveat specific to overriding JRE classes in this way is that they will never actually be used in development mode. In development mode, the native JRE classes always supersede classes compiled from source.
The <super-source> element supports pattern-based
filtering to allow fine-grained control over which resources get copied
into the output directory during a GWT compile.
XML Element Reference
This section documents the most commonly used elements in the module XML file.
-
<inherits name="_logical-module-name_" />: Inherits all the settings from the specified module as if the contents of the inherited module's XML were copied verbatim. Any number of modules can be inherited in this manner. See also this advice about deciding which modules to inherit. -
<entry-point class="_classname_" />: Specifies an entry point class. Any number of entry-point classes can be added, including those from inherited modules. Entry points are all compiled into a single codebase. They are called sequentially in the order in which they appear in the module file. So when theonModuleLoad()of your first entry point finishes, the next entry point is called immediately. -
<source path="_path_" />: Each occurrence of the<source>tag adds a package to the source path by combining the package in which the module XML is found with the specified path to a subpackage. Any Java source file appearing in this subpackage or any of its subpackages is assumed to be translatable. The<source>element supports pattern-based filtering to allow fine-grained control over which resources get copied into the output directory during a GWT compile.
If no
<source>element is defined in a module XML file, the client subpackage is implicitly added to the source path as if<source path="client" />had been found in the XML. This default helps keep module XML compact for standard project layouts.
<public path="_path_" />: Each occurrence of the<public>tag adds a package to the public path by combining the package in which the module XML is found with the specified path to identify the root of a public path entry. Any file appearing in this package or any of its subpackages will be treated as a publicly-accessible resource. The<public>element supports pattern-based filtering to allow fine-grained control over which resources get copied into the output directory during a GWT compile.
If no
<public>element is defined in a module XML file, the public subpackage is implicitly added to the public path as if<public path="public">had been found in the XML. This default helps keep module XML compact for standard project layouts.
<servlet path="_url-path_" class="_classname_" />: For RPC, this element loads a servlet class mounted at the specified URL path. The URL path should be absolute and have the form of a directory (for example,/calendar). Your client code then specifies this URL mapping by annotating the service interface with the @RemoteServiceRelativePath attribute. Any number of servlets may be loaded in this manner, including those from inherited modules.
The
<servlet>element applies only to GWT's embedded server server-side debugging feature.
NOTE: as of GWT 1.6, this tag does no longer loads servlets in development mode, instead you must configure a
WEB-INF/web.xmlin your war directory to load any servlets needed.
-
<script src="_js-url_" />: Automatically injects the external JavaScript file located at the location specified by src. See automatic resource inclusion for details. If the specified URL is not absolute, the resource will be loaded from the module's base URL (in other words, it would most likely be a public resource). -
<stylesheet src="_css-url_" />: Automatically injects the external CSS file located at the location specified by src. See automatic resource inclusion for details. If the specified URL is not absolute, the resource will be loaded from the module's base URL (in other words, it would most likely be a public resource). -
<extend-property name="_client-property-name_" values="_comma-separated-values_" />: Extends the set of values for an existing client property. Any number of values may be added in this manner, and client property values accumulate through inherited modules. You will likely only find this useful for specifying locales in internationalization.
Elements for Deferred Binding
The following elements are used for defining deferred binding rules. Deferred binding is not commonly used in user projects.
-
<replace-with class="_replacement_class_name_">: A directive to use deferred binding with replacement. -
<generate-with class="_generator_class_name_">: A directive to use deferred binding using a Generator -
<define-property name="_property_name_" values="_property_values_">: Define a property and allowable values (comma-separated identifiers). This element is typically used to generate a value that will be evaluated by a rule using a<when...>element. -
<set-property name="_property_name_" value="_property_value_">: Set the value of a previously-defined property (see<define property>above). This element is typically used to generate a value that will be evaluated by a rule using a<when...>element. Note thatset-propertyandproperty-provideron the same value will overwrite each other. The last definition encountered is the one that is used. -
<property-provider name="_property_name_">: Define a JavaScript fragment that will return the value for the named property at runtime. This element is typically used to generate a value that will be evaluated in a<when...>element. To see examples of<property-provider>definitions in action, see the filesI18N.gwt.xmlandUserAgent.gwt.xmlin the GWT source code. Note thatset-propertyandproperty-provideron the same value will overwrite each other. The last definition encountered is the one that is used.
Defining conditions
The <replace-with-class> and <generate-with-class> elements can take a <when...> child element that defines when this rule should
be used, much like the WHERE predicate of an SQL query. The three different types of predicates are:
-
<when-property-is name="_property_name_" value="_value_" />: Deferred binding predicate that is true when a named property has a given value. -
<when-type-assignable class="_class_name_" />: Deferred binding predicate that is true for types in the type system that are assignable to the specified type. -
<when-type-is class="_class_name_" />: Deferred binding predicate that is true for exactly one type in the type system.
Several different predicates can be combined into an expression. Surround your <when...> elements using the following nesting elements begin/end tags:
-
<all>when_expressions</all>: Predicate that ANDs all child conditions. -
<any>when_expressions</any>: Predicate that ORs all child conditions. -
<none>when_expressions</none>: Predicate that NANDs all child conditions.
Deferred Binding Example
As an example module XML file that makes use of deferred binding rules, here is a module XML file from the GWT source code, Focus.gwt.xml:
<module>
  <inherits name="com.google.gwt.core.Core" />
  <inherits name="com.google.gwt.user.UserAgent" />

  <!-- old Mozilla, and Opera need a different implementation -->
  <replace-with class="com.google.gwt.user.client.ui.impl.FocusImplOld">
    <when-type-is class="com.google.gwt.user.client.ui.impl.FocusImpl" />
      <any>
        <when-property-is name="user.agent" value="gecko" />
        <when-property-is name="user.agent" value="opera" />
      </any>
  </replace-with>

  <!--  Safari needs a different hidden input -->
  <replace-with class="com.google.gwt.user.client.ui.impl.FocusImplSafari">
    <when-type-is class="com.google.gwt.user.client.ui.impl.FocusImpl" />
    <when-property-is name="user.agent" value="safari" />
  </replace-with>

  <!-- IE's implementation traps exceptions on invalid setFocus() -->
  <replace-with class="com.google.gwt.user.client.ui.impl.FocusImplIE6">
  <when-type-is class="com.google.gwt.user.client.ui.impl.FocusImpl" />
    <any>
      <when-property-is name="user.agent" value="ie6" />
    </any>
  </replace-with>
</module>
How do I know which GWT modules I need to inherit?
GWT libraries are organized into modules. The standard modules contain big pieces of functionality designed to work independently of each other. By selecting only the modules you need for your project (for example the JSON module rather than the XML module), you minimize complexity and reduce compilation time.
Generally, you want to inherit at least the User module. The User module contains all the core GWT functionality, including the EntryPoint class. The User module also contains reusable UI components (widgets and panels) and support for the History feature, Internationalization, DOM programming, and more.
Standard Modules GWT 1.5
| Module | Logical Name | Module Definition | Contents |
|---|---|---|---|
| User | com.google.gwt.user.User | User.gwt.xml | Core GWT functionality |
| HTTP | com.google.gwt.http.HTTP | HTTP.gwt.xml | Low-level HTTP communications library |
| JSON | com.google.gwt.json.JSON | JSON.gwt.xml | JSON creation and parsing |
| JUnit | com.google.gwt.junit.JUnit | JUnit.gwt.xml | JUnit testing framework integration |
| XML | com.google.gwt.xml.XML | XML.gwt.xml | XML document creation and parsing |
GWT 1.5 also provides several theme modules which contain default styles for widgets and panels. You can specify one theme in your project's module XML file to use as a starting point for styling your application, but you are not required to use any of them.
Themes
| Module | Logical Name | Module Definition | Contents |
|---|---|---|---|
| Chrome | com.google.gwt.user.theme.chrome.Chrome | Chrome.gwt.xml | Style sheet and images for the Chrome theme. |
| Dark | com.google.gwt.user.theme.dark.Dark | Dark.gwt.xml | Style sheet and images for the Dark theme. |
| Standard | com.google.gwt.user.theme.standard.Standard | Standard.gwt.xml | Style sheet and images for the Standard theme. |
How To
To inherit a module, edit your project's module XML file and specify the logical name of the module you want to inherit in the <inherits> tag.
<inherits name="com.google.gwt.junit.JUnit"/>
Note: Modules are always referred to by their logical names. The logical name of a module is of the form pkg1.pkg2.ModuleName (although any number of packages may be present). The logical name includes neither the actual file system path nor the file extension.
Automatic Resource Inclusion
Modules can contain references to external JavaScript and CSS files, causing them to be automatically loaded when the module itself is loaded. This can be handy if your module is intended to be used as a reusable component because your module will not have to rely on the HTML host page to specify an external JavaScript file or stylesheet.
Including External JavaScript
Script inclusion is a convenient way to automatically associate external JavaScript files with your module. Use the following syntax to cause an external JavaScript file to be loaded into the host page before your module entry point is called.
<script src="_js-url_"/>
The script is loaded into the namespace of the host page as if you had included it explicitly using the HTML
<script> element. The script will be loaded before your onModuleLoad() is called.
Versions of GWT prior to 1.4 required a script-ready function to determine when an included script was loaded. This is no longer required; all included scripts will be loaded when your application starts, in the order in which they are declared.
Including External Stylesheets
Stylesheet inclusion is a convenient way to automatically associate external CSS files with your module. Use the following syntax to cause a CSS file to be automatically attached to the host page.
<stylesheet src="_css-url_"/>
You can add any number of stylesheets this way, and the order of inclusion into the page reflects the order in which the elements appear in your module XML.
Relative vs. Absolute URL
If an absolute URL is specified in the src attribute, that URL will be used verbatim. However, if a non-absolute URL is used (for example, "foo.css"), the module's
base URL is prepended to the resource name. This is identical to constructing an absolute URL using GWT.getModuleBaseForStaticFiles() + "foo.css" in client code. This is useful when
the target resource is from the module's public path.
Inclusion and Module Inheritance
Module inheritance makes resource inclusion particularly convenient. If you wish to create a reusable library that relies upon particular stylesheets or JavaScript files, you can be sure that clients of your library have everything they need automatically by inheriting from your module.
See Also
Filtering Public and Source Packages
The module XML format's <public>, <source> and <super-source> elements
supports certain attributes and nested elements to allow pattern-based inclusion and exclusion in the public path. These
elements follow the same rules as Ant's FileSet element. Please see the documentation for FileSet for a general overview. These elements do not support the full
FileSet semantics. Only the following attributes and nested elements are currently supported:
- The
includesattribute - The
excludesattribute - The
defaultexcludesattribute - The
casesensitiveattribute - Nested
includetags - Nested
excludetags
Other attributes and nested elements are not supported.
Important
The default value of defaultexcludes is true. By default, the patterns listed here are excluded.
The Bootstrap Sequence
Consider the following HTML page that loads a GWT module:
<!DOCTYPE html PUBLIC "-//W3C//DTD XHTML 1.0 Transitional//EN" "http://www.w3.org/TR/xhtml1/DTD/xhtml1-transitional.dtd">
<html>
  <body onload='alert("w00t!")'>
    <img src='bigImageZero.jpg'></img>
    <script source='externalScriptZero.js'></script>
    <img src='bigImageOne.jpg'></img>
    <img src='reallyBigImageTwo.jpg'></img>
    <script src='myApp/myApp.nocache.js'></script>
    <script src='externalScriptOne.js'></script>
  </body>
</html>
The following principles are needed to understand the sequence of operations that will occur in this page:
<script>tags always block evaluation of the page until the script is fetched and evaluated.<img>tags do not block page evaluation.- Most browsers will allow a maximum of two simultaneous connections for fetching resources.
- The
body.onload()event will only fire once all external resources are fetched, including images and frames. - The GWT selection script (i.e.
myApp/myApp.nocache.js) will be fetched and evaluated like a normal script tag, but the compiled script will be fetched asynchronously. - Once the GWT selection script has started, its
onModuleLoad()can be called at any point after the outer document has been parsed.
Applying these principles to the above example, we obtain the following sequence (the order requests complete can vary greatly, this is only one way it could happen, as an example):
- The HTML document is fetched and parsing begins.
- Begin fetching
bigImageZero.jpg. - Begin fetching
externalScriptZero.js. bigImageZero.jpgcompletes (let's assume). Parsing is blocked untilexternalScriptZero.jsis done fetching and evaluating.externalScriptZero.jscompletes.- Begin fetching
bigImageOne.jpgandreallyBigImageTwo.jpgsimultaneously. bigImageOne.jpgcompletes (let's assume again).myApp/myApp.nocache.jsbegins fetching and evaluating.myApp/myApp.nocache.jscompletes, and the compiled script (<hashname>.cache.js) begins fetching in a hiddenIFRAME(this is non-blocking).<hashname>.cache.jscompletes.onModuleLoad()is not called yet, as we're still waiting onexternalScriptOne.jsto complete before the document is considered 'ready'.externalScriptOne.jscompletes. The document is ready, so onModuleLoad() fires.reallyBigImageTwo.jpgcompletes.body.onload()fires, in this case showing an alert() box.
This is a bit complex, but the point is to show exactly when various resources are fetched, and when onModuleLoad() will be called. The most important things to
remember are that
- You want to put the GWT selection script as early as possible within the body, so that it begins fetching the compiled script before other scripts (because it won't block any other script requests).
- If you are going to be fetching external images and scripts, you want to manage your two connections carefully.
<img>tags are not guaranteed to be done loading whenonModuleLoad()is called.<script>tags are guaranteed to be done loading whenonModuleLoad()is called.
A Note on Multiple GWT Modules and EntryPoints
If you have multiple EntryPoints (the interface that defines onModuleLoad()) within a module, they will all be called in sequence as soon as that module (and the outer
document) is ready.
If you are loading multiple GWT modules within the same page, each module's EntryPoint will be called as soon as both that module and the outer document is ready. Two modules' EntryPoints are not guaranteed to fire at the same time, or in the same order in which their selection scripts were specified in the host page.