Testing
Sumit Chandel, Google Developer Relations
March 2009
This article is a direct adaptation of Daniel Wellman's excellent article, "GWT: Writing Ajax Applications Test-First", published in Better Software magazine (November 2008).
One of the core features of GWT is testability, which means we can easily test our applications using a set of tried-and-true testing tools. Testability for GWT applications breaks down into the three following types of testing components:
- Standard JUnit TestCases
- GWTTestCases (subclasses of the JUnit TestCase)
- Selenium Testing
Testing a GWT application might seem a little daunting at first, since GWT application code runs as Java instead of JavaScript. However, using these testing components to thoroughly test our application is actually quite simple, and what's more is that we can apply strong design patterns to our code that will help keep our test cases concise, effective and maintainable. Before getting into testing methodologies and design patterns we can use to test our GWT applications, let's first explain GWT's Testing Infrastructure.
GWT's Testing Infrastructure
Since a GWT application is almost entirely written in the Java programming language, you can test a good part of it using standard JUnit TestCases. However, GWT also includes a special TestCase subclass, the GWTTestCase class, which can test code that requires JavaScript at runtime. While ultimately all of your client-side Java code will be cross-compiled to JavaScript, only some of it uses code directly implemented as JavaScript. For example, the following code is from the GWT HTMLTable class:
public void setStylePrimaryName(int row, int column, String styleName) {
  UIObject.setStylePrimaryName(getCellElement(bodyElem, row, column), styleName);
}

private native Element getCellElement(Element table, int row, int col) /*-{
  var out = table.rows[row].cells[col];
  return (out == null ? null : out);
}-*/;
This code sample demonstrates a method written in Java (setStylePrimaryName) which relies on code implemented directly in JavaScript indicated by the native keyword (getCellElement). Many of the GWT libraries include some native code as demonstrated above; in particular, all widgets manipulate the DOM. This means that when you're running unit tests over components that execute JavaScript natively, they must be running in an environment supporting the JavaScript runtime, such as the one provided by the hosted mode browser.
To test components that rely on JavaScript code natively, GWT provides a subclass of JUnit's TestCase called GWTTestCase. This base class allows you to implement your JUnit test case as you normally would; in fact, GWTTestCases look almost identical to the standard JUnit TestCase:
public class MeetingSummaryLabelTest extends GWTTestCase {
  public String getModuleName() {
    return "com.danielwellman.booking.Booking";
  }

  // Add tests here
}
The only visible difference is that all GWTTestCases must override an abstract method called getModuleName, which returns a String containing the name of your GWT code module as defined in your application's module XML file.
When you run your test, the GWT framework starts up an invisible (or "headless") hosted mode browser and then evaluates your test case. What this means is that all the facilities of the hosted browser are available to your test case; you can run native JavaScript functions, render widgets, or invoke asynchronous remote procedure calls. Furthermore, you can run your tests either as a hybrid of Java and JavaScript code (in hosted mode), or compile and run all your GWT code as JavaScript (in web mode). All you need to do is declare and pass the -Dgwt.args="-web" Java runtime argument to the TestRunner process when running your test. It is highly recommended that you run your tests both in hosted mode and web mode, since there are some subtle differences between Java and JavaScript which could cause unexpected failures.
Setting up the classpath to run these tests requires both the source and interim compiled Java classes for the test code be passed to the test runner. GWT provides a tool called "junitCreator" which will generate an empty GWTTestCase for you along with the required scripts to run the tests both in hosted and web mode.
Being able to test native JavaScript code in your JUnit tests is great, but there are some caveats and limitations. First, the normal browser event mechanisms do work as expected in test mode, but you would need to add somewhat adventitious code to do things like programmatically click a button and expect the corresponding event handlers to be fired. (e.g. onClick). The best approach to handle cases where you would like to test through event listeners is to write Selenium tests that run against the browser with all event mechanisms in place. There are also performance considerations; running the TestCase forces a compilation of the source code in your module, which incurs an initial startup delay. Furthermore, each individual test case requires starting up and shutting down the headless browser . which can take several seconds. One useful technique to use is to group your test cases into TestSuites, so that tests can run in a single suite and only incur a single compilation / hosted mode startup cost per suite.
So when should you extend a standard JUnit TestCase or GWTTestCase? In general, you should prefer standard JUnit TestCases because they run orders of magnitude faster than a GWTTestCase. If your code executes native JavaScript, then your test must extend GWTTestCase this frequently includes any code which uses the supplied GWT libraries. The upshot is that if you simply instantiate a widget in the code being tested, you will have to test this using a GWTTestCase. However, you should consider if there is another design approach which avoids this native code requirement, such as moving the logic to another class.
GUI Design Patterns
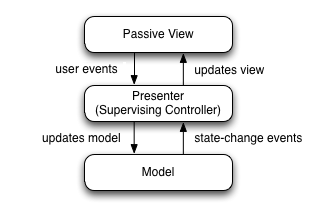
There are several design patterns and techniques you can use to build a testable GUI application. All of them focus on one core principle: move as much logic out of the view into other more easily testable layers. One common pattern that can help with this is known as Model-View-Presenter, where a presenter object acts as a mediator between the view (GUI) and model objects and instructs the view layer to change states in response to user input or model changes. The pattern is very similar to the more widely known MVC pattern, however rather than have the presentation logic shared by the Controller and the View, in MVP, all presentation logic is pushed to the presenter. The diagram below illustrates both patterns to help visualize the difference between them.
MVC...

Vs MVP
Example
To illustrate some of these concepts, let's take a look at building a small portion of an application. For this example, we're building an online application for booking meeting rooms at a conference center. A user will need to specify some details about the meeting, including the expected capacity and date. The application will check with a scheduling back end service to determine if the room is available. If it's not available, the Save button will dim and a message will be displayed. See Figure 1 for a sample layout of this dialog.
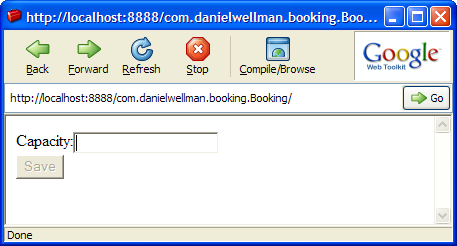
Figure 1 The first iteration of the UI for the Booking application
After some quick drawing at a whiteboard, we come up with a rough sketch of the objects involved as shown in Figure 2.
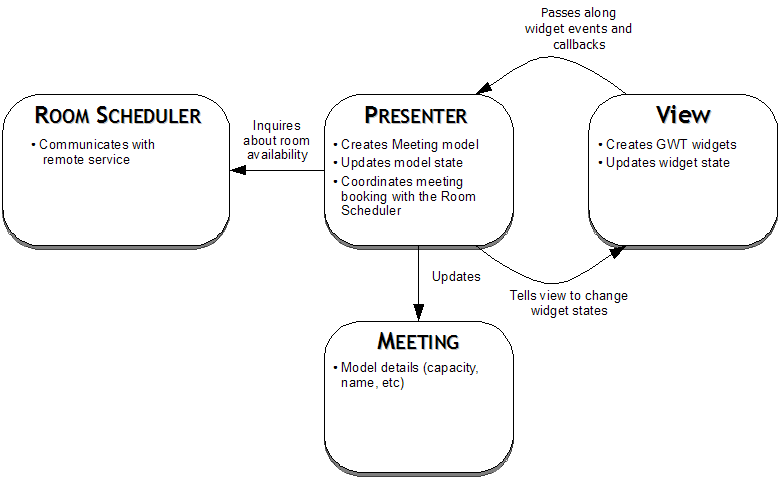
Figure 2 Object responsibilities and interactions for the Booking application
Building the Presenter
The key to testing presenters is that they will be plain old Java code and can be tested like any other Java code with JUnit. A mock object library like EasyMock can be used to test the interactions between the presenter and the view components. For those who are more familiar with other mock object libraries, Daniel Wellman does an excellent treatment of this same example using jMock instead of EasyMock in the article mentioned in the introduction.
Let's try to tackle a small slice of this functionality: the user enters a meeting capacity that cannot be scheduled. First, the view will notify the presenter that the user changed the value of the capacity text field. The presenter will then ask the RoomScheduler service if it can accept a new meeting with the specified capacity. Finally, the presenter will tell the view to disable the save button. Let's write a test for this scenario:
import static org.easymock.EasyMock.*;

public class PresenterTest extends TestCase {

   @Test
   public void test_an_unavailable_room_disables_the_save_button() {
     final MeetingView view = createMock(MeetingView.class);
     final RoomScheduler scheduler = createMock(RoomScheduler.class);

     final Meeting meeting = new Meeting();
     final Presenter presenter = new Presenter(meeting, view, scheduler);

     // The schedule service will reply with no available capacity
     expect(scheduler.canAcceptCapacityFor(meeting)).andReturn(false);
     view.disableSaveButton();
     replay(scheduler);
     replay(view);
     presenter.requiredCapacityChanged(new FakeTextContainer("225"));

     verify(scheduler);
     verify(view);

     assertEquals("Should have updated the model's capacity", 225, meeting.getCapacity());
  }
}
This test is an interaction-based test which uses EasyMock to provide test doubles for the View and the RoomScheduler. We stub out the scheduler to reply that it cannot accept capacity for the meeting, and expect our view to be told to disable the save button. Note here that the View ends up being fairly dumb; it does nothing but notify the presenter whenever the required capacity is changed.
This code requires that we specify an interface for our view:
public interface MeetingView {
  void disableSaveButton();
}
... and for our service:
public interface RoomScheduler {
  boolean canAcceptCapacityFor(Meeting meeting);
}
The code that passes this test is fairly simple:
public class Presenter {
  private Meeting meeting;
  private MeetingView meetingView;
  private RoomScheduler roomScheduler;

  public Presenter(Meeting meeting, MeetingView meetingView, RoomScheduler roomScheduler) {
    this.meeting = meeting;
    this.meetingView = meetingView;
    this.roomScheduler = roomScheduler;
  }

  /**
   * Callback when the view's capacity text box changes
   *
   * @param textField the capacity TextBox widget
   */
  public void requiredCapacityChanged(HasText textField) {
    meeting.setCapacity(Integer.parseInt(textField.getText()));
    if (!roomScheduler.canAcceptCapacityFor(meeting)) {
      meetingView.disableSaveButton();
    }
  }

  protected Meeting getMeeting() {
    return meeting;
  }
}
The Presenter is responsible for orchestrating the call to the remote service and instructing the view to disable the save button. Note also that we're choosing to let the Presenter maintain the state of the Meeting object, so that all UI events ultimately modify this object.
This is a very simple implementation, but it's far from the completed design. Our next test would probably check that setting an acceptable capacity enables the save button, and drive us to either make a new method "enableSaveButton" or a generalized "setSaveButtonAvailable" method on the view. We're still testing plain Java objects that don't require any JavaScript, so these tests run quickly.
Note the argument to requiredCapacityChanged is of the type HasText. This turns out to be an interface that is part of the GWT libraries:
package com.google.gwt.user.client.ui;

public interface HasText {

  /**
   * Gets this object's text.
   */
  String getText();

  /**
   * Sets this object's text.
   *
   * @param text the object's new text
   */
  void setText(String text);
}
This simple interface is used by many GWT components and allows manipulation of a widget's text contents, including the TextBox in our example. This interface is extremely useful for testing because we don't need to pass in a real TextBox. Thus we avoid instantiating a text input in the DOM, requiring our test to extend GWTTestCase to run in a real browser. In this example, I've made a very simple fake implementation which wraps a String:
public class FakeTextContainer implements HasText {
  private String text;

  public FakeTextContainer(String text) {
    this.text = text;
  }

  public String getText() {
    return text;
  }

  public void setText(String text) {
    this.text = text;
  }
}
Finally, let's take a look at our view implementation:
public class MeetingViewWidget extends Composite implements MeetingView {
  private Button saveButton = new Button("Save");
  private TextBox capacityText = new TextBox();

  public MeetingViewWidget() {
    VerticalPanel mainPanel = new VerticalPanel();

    HorizontalPanel row = new HorizontalPanel();
    row.add(new Label("Capacity:"));
    row.add(capacityText);

    mainPanel.add(row);
    mainPanel.add(saveButton);

    // Start with the save button disabled
    saveButton.setEnabled(false);

    // Here the view is responsible for creating the model and presenter
    final Presenter presenter = new Presenter(new Meeting(), this, new RemoteRoomScheduler());
    capacityText.addChangeListener(new ChangeListener() {
      public void onChange(Widget sender) {
        presenter.requiredCapacityChanged((HasText) sender);
      }
    });

    initWidget(mainPanel);
  }

  public void disableSaveButton() {
    saveButton.setEnabled(false);
  }
}
And lastly, the Meeting class code, for completeness:
public class Meeting {
  private Integer capacity;

  public int getCapacity() {
    return capacity;
  }

  public void setCapacity(int capacity) {
    this.capacity = capacity;
  }
}
As you can see, there's not much logic here. Most of the code is involved in setting up the event listeners and configuring the display widgets. So how do we test it in a GWTTestCase?
We don't. In fact, there's not much that can be tested here in an automated test; as stated earlier, event propagation won't work by default in a GWTTestCase. Here is where Selenium testing can be useful. The tests we write for our widgets run in the deployed browser environment, meaning that the testing context will have all the event listeners it expects available for testing. In GWT 1.5, we introduced traceable debug ids, set through the new UIObject.ensureDebugId() method, which allows us to set the debug id on a given widget. We can later track these widget using their debug ids when writing our Selenium tests.
If you are building a widget library then you might want to write GWTTestCases that test the widget through its API, which is what the GWT team does with the widgets included in GWT such as Button, TextBox, and Tree. However, these tests are slow and any complex logic could be moved into a simple presenter object which could be tested in a plain old fast JUnit TestCase.
Testing Asynchronous Access to Remote Services
GWT provides a Remote Procedure Call mechanism (RPC) which enables passing of Java objects between the server and client using a server-side serialization library. GWTTestCase supports testing of these features by providing utility methods which facilitate writing asynchronous tests. Most of the information available on GWTTestCase focuses on these RPC cases, and I recommend reading it for the full story. Refer to the Asynchronous Testing section in the GWT documentation for a brief introduction.