UiCustomCells
If you use a CellTable or other Cell Widgets in your applications, you will probably want to create custom Cells tailored for your data. Cells are like widget flyweights, so a single Cell can render multiple DOM instances of itself, and it can handle events from multiple rendered instances. This patterns lends itself well to an MVP design, as we'll show here.
This developer guide describes patterns for creating simple one-off Cells, as well as creating re-usable cells that can be "skinned". If you are not familiar with the cell widgets, you should read the Cell Widgets Developer Guide before continuing.
Cell Basics
Implementing the render() Method
The core method that all Cells must implement is the
Cell#render(Context, C value, SafeHtmlBuilder)
method, which renders the parameterized value into the SafeHtmlBuilder. In some cases, you will only need to render
simple HTML, such as a single div with some content. In other cases, you might need to render a complex HTML structure, such as the one
in the CellList example, which contains an image and two lines of
text. The basic principles are the same in either case.
Code Example
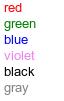
ColorCell is a custom Cell that extends AbstractCell<String> and generates a single div
containing the name of a color, styled with specified color as the text color. The generated HTML
for each rendered value is <div style="color: value">value</div>, where value is the color of
the cell. In the example below, ColorCell is passed into a CellList to render various colors.
The first row contains the string "red" colored red, the second is "green" colored green, and so
forth, as seen below.
When implementing a render method, you should follow these steps:
-
Create a subclass of AbstractCell, parameterized with the type of value you want to render.
WARNING: Implement the Cell interface directly at your own risk. The Cell interface may change in subtle but breaking ways as we continuously seek to improve performance. We provide AbstractCell so we can modify the Cell interface without breaking your code. -
Within the render method, always check if the value is
null. Even if you do not include null values in your data, Cell widgets might pass anullvalue into your Cell to render "filler" Cells, such as when you pass data in the middle of the visible range. You can either exit early from the render method, or you can render some placeholder value. -
If the value comes from user data, make sure that you escape it using SafeHtmlUtils or one of the other escaping libraries. The rendered cell will be added to the document without additional escaping, so if your Cell renders malicious javascript code, it will be included in the document. SafeHtmlBuilder tries to enforce this.
-
Render the HTML that represents the Cell into the SafeHtmlBuilder.
You can download this example at CellExample.java.
/**
 * Example of creating a custom {@link Cell}.
 */
public class CellExample implements EntryPoint {

  /**
   * A custom {@link Cell} used to render a string that contains the name of a
   * color.
   */
  static class ColorCell extends AbstractCell<String> {

    /**
     * The HTML templates used to render the cell.
     */
    interface Templates extends SafeHtmlTemplates {
      /**
       * The template for this Cell, which includes styles and a value.
       *
       * @param styles the styles to include in the style attribute of the div
       * @param value the safe value. Since the value type is {@link SafeHtml},
       *          it will not be escaped before including it in the template.
       *          Alternatively, you could make the value type String, in which
       *          case the value would be escaped.
       * @return a {@link SafeHtml} instance
       */
      @SafeHtmlTemplates.Template("<div style=\"{0}\">{1}</div>")
      SafeHtml cell(SafeStyles styles, SafeHtml value);
    }

    /**
     * Create a singleton instance of the templates used to render the cell.
     */
    private static Templates templates = GWT.create(Templates.class);

    @Override
    public void render(Context context, String value, SafeHtmlBuilder sb) {
      /*
       * Always do a null check on the value. Cell widgets can pass null to
       * cells if the underlying data contains a null, or if the data arrives
       * out of order.
       */
      if (value == null) {
        return;
      }

      // If the value comes from the user, we escape it to avoid XSS attacks.
      SafeHtml safeValue = SafeHtmlUtils.fromString(value);

      // Use the template to create the Cell's html.
      SafeStyles styles = SafeStylesUtils.forTrustedColor(safeValue.asString());
      SafeHtml rendered = templates.cell(styles, safeValue);
      sb.append(rendered);
    }
  }

  /**
   * The list of data to display.
   */
  private static final List<String> COLORS = Arrays.asList("red", "green", "blue", "violet",
      "black", "gray");

  @Override
  public void onModuleLoad() {
    // Create a cell to render each value.
    ColorCell cell = new ColorCell();

    // Use the cell in a CellList.
    CellList<String> cellList = new CellList<String>(cell);

    // Push the data into the widget.
    cellList.setRowData(0, COLORS);

    // Add it to the root panel.
    RootPanel.get().add(cellList);
  }
}
Handling events from Cells
The other core method to implement (if you want to handle events in the Cell) is
Cell#onBrowserEvent(Context, Element, C value, NativeEvent, ValueUpdater). onBrowserEvent is called when an event occurs on any DOM instance created with the
HTML output of this Cell. Since Cells are flyweights that handle events from multiple instances, contextual information about the instance is passed into the method.
For example, the Context tells you where the Cell is located (row and column indexes) in its containing CellTable.
The parent element refers to the DOM element that contains the rendered HTML from your Cell. It is not the outer most element of your Cell. Cells are not required to have only one outer most element. For example TextCell does not even render an HTML element, it renders only the text string.
Specifying which events to handle
Cells must declare which event types they want to handle, and the Cell Widget that contains the Cell is responsible for ensuring that only those events are passed to the Cell. In order to specify which events your cell will handle, you pass the event types into the AbstractCell(String...) constructor. AbstractCell will return the events to the Cell Widget when Cell#getConsumedEvents() is called.
Alternatively, you can override
Cell#getConsumedEvents()
directly. For example, if you are extending an existing Cell that does not expose the event type constructor, you can override getConsumedEvents() to return the
events that your subclass uses.
WARNING: The return value of getConsumedEvents() should not change on subsequent calls. Cell Widgets are only required to call the
method once, when the Cell is first added.
Code Example
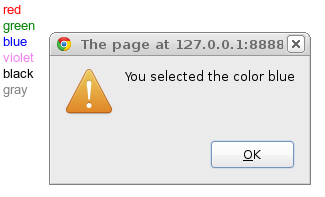
The code example below extends ColorCell to add support for handling click and keydown events. If the user clicks on the Cell, we
show an alert box that tells us which color we selected.
The process for adding event support is as follows:
- Specify the events that you want to handle by passing them into the
AbstractCell(String...)
constructor. See the note about the
keydownevent below. - Override the Cell#onBrowserEvent() method to handle the event. For some events, you may want to look at the event target before deciding how to handle the event. In the example below, we only respond to click events that actually occur on the rendered div.
- As described in the example comments below, the
onEnterKeyDown()method is a special case convenience method in AbstractCell that helps to provide a unified user experience, such that all Cells that respond to events can be activated by selecting the Cell with the keyboard and pressing enter. Otherwise, users would not be able to interact with the Cell without using the mouse. The convention followed by GWT cells is to toggle editing when the enter key is pressed, but you are free to define the behavior for your app. Your cell's getConsumedEvents() method must include "keydown" in order for AbstractCell to callonEnterKeyDown(). - Optionally call ValueUpdater#update(C)
to indicate that the value of the cell has been modified. For example, you might call the
update()method if the user types a new value in a text box, or if the user clicks on a button.
/**
 * Example of creating a custom {@link Cell} that responds to events.
 */
public class CellWithEventsExample implements EntryPoint {

  /**
   * A custom {@link Cell} used to render a string that contains the name of a
   * color.
   */
  static class ColorCell extends AbstractCell<String> {

    /**
     * The HTML templates used to render the cell.
     */
    interface Templates extends SafeHtmlTemplates {
      /**
       * The template for this Cell, which includes styles and a value.
       *
       * @param styles the styles to include in the style attribute of the div
       * @param value the safe value. Since the value type is {@link SafeHtml},
       *          it will not be escaped before including it in the template.
       *          Alternatively, you could make the value type String, in which
       *          case the value would be escaped.
       * @return a {@link SafeHtml} instance
       */
      @SafeHtmlTemplates.Template("<div style=\"{0}\">{1}</div>")
      SafeHtml cell(SafeStyles styles, SafeHtml value);
    }

    /**
     * Create a singleton instance of the templates used to render the cell.
     */
    private static Templates templates = GWT.create(Templates.class);

    public ColorCell() {
      /*
       * Sink the click and keydown events. We handle click events in this
       * class. AbstractCell will handle the keydown event and call
       * onEnterKeyDown() if the user presses the enter key while the cell is
       * selected.
       */
      super("click", "keydown");
    }

    /**
     * Called when an event occurs in a rendered instance of this Cell. The
     * parent element refers to the element that contains the rendered cell, NOT
     * to the outermost element that the Cell rendered.
     */
    @Override
    public void onBrowserEvent(Context context, Element parent, String value, NativeEvent event,
        ValueUpdater<String> valueUpdater) {
      // Let AbstractCell handle the keydown event.
      super.onBrowserEvent(context, parent, value, event, valueUpdater);

      // Handle the click event.
      if ("click".equals(event.getType())) {
        // Ignore clicks that occur outside of the outermost element.
        EventTarget eventTarget = event.getEventTarget();
        if (parent.getFirstChildElement().isOrHasChild(Element.as(eventTarget))) {
          doAction(value, valueUpdater);
        }
      }
    }

    @Override
    public void render(Context context, String value, SafeHtmlBuilder sb) {
      /*
       * Always do a null check on the value. Cell widgets can pass null to
       * cells if the underlying data contains a null, or if the data arrives
       * out of order.
       */
      if (value == null) {
        return;
      }

      // If the value comes from the user, we escape it to avoid XSS attacks.
      SafeHtml safeValue = SafeHtmlUtils.fromString(value);

      // Use the template to create the Cell's html.
      SafeStyles styles = SafeStylesUtils.forTrustedColor(safeValue.asString());
      SafeHtml rendered = templates.cell(styles, safeValue);
      sb.append(rendered);
    }

    /**
     * onEnterKeyDown is called when the user presses the ENTER key will the
     * Cell is selected. You are not required to override this method, but its a
     * common convention that allows your cell to respond to key events.
     */
    @Override
    protected void onEnterKeyDown(Context context, Element parent, String value, NativeEvent event,
        ValueUpdater<String> valueUpdater) {
      doAction(value, valueUpdater);
    }

    private void doAction(String value, ValueUpdater<String> valueUpdater) {
      // Alert the user that they selected a value.
      Window.alert("You selected the color " + value);

      // Trigger a value updater. In this case, the value doesn't actually
      // change, but we use a ValueUpdater to let the app know that a value
      // was clicked.
      valueUpdater.update(value);
    }
  }

  /**
   * The list of data to display.
   */
  private static final List<String> COLORS = Arrays.asList("red", "green", "blue", "violet",
      "black", "gray");

  @Override
  public void onModuleLoad() {
    // Create a cell to render each value.
    ColorCell cell = new ColorCell();

    // Use the cell in a CellList.
    CellList<String> cellList = new CellList<String>(cell);

    // Push the data into the widget.
    cellList.setRowData(0, COLORS);

    // Add it to the root panel.
    RootPanel.get().add(cellList);
  }
}