Compiling and Debugging
Let's start with the core principle of GWT development:
- If your GWT application runs in development mode as you expect...
- and the GWT compiler successfully compiles your application into JavaScript...
- then your application will work the same way in a web browser as it did in development mode.
The rest of this section introduces development mode (previously called "hosted mode") and production mode (previously called "web mode") and explains how and when to use each.
- Debugging in Development Mode
- Launching an application in development mode
- GWT Development Mode
- Launching a Browser
- Generating debug messages in development mode: GWT.log()
- Enabling internal GWT debug messages
- Using an IDE with Development Mode
- An Example Launch
- Language differences between production mode and development mode
- Customizing the development experience
- Using EJBs in development mode
- Using my own server in development mode instead of GWT's built-in Jetty instance
- Development Mode Options
- Super Dev Mode
- Running in Production Mode
- Understanding the GWT Compiler
Debugging in Development Mode
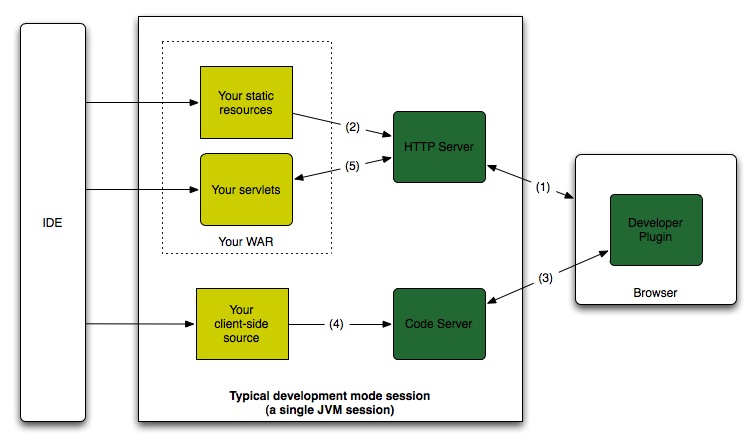
You will spend most of your development time running your application in development mode, which means that you are interacting with your GWT application without it having been translated into JavaScript. Anytime you edit, run, and debug applications from a Java integrated development environment (IDE), you are working in development mode. When an application is running in development mode, the Java Virtual Machine (JVM) is actually executing the application code as compiled Java bytecode, using GWT plumbing to connect to a browser window. This means that the debugging facilities of your IDE are available to debug both your client-side GWT code and any server-side Java code as well. By remaining in this traditional "code-test-debug" cycle, development mode is by far the most productive way to develop your application quickly.
A typical development mode session can be seen below:
Launching an application in development mode
To launch a development mode session, from the command line run ant devmode, assuming you have an Ant build.xml file generated by
webAppCreator.
Tip: If you are using Eclipse, you can instead run the <app>.launch configuration file created by webAppCreator using the Run or Debug
menus.
If you didn't use webAppCreator, you can manually run the main class in
com.google.gwt.dev.DevMode found in gwt-dev.jar.
Important: If you are not using a generated launch config, be aware that GWT development mode looks for modules (and therefore client-side source) using the JVM's classpath. Make sure to add your source directories first in your classpath.
GWT Development Mode
Note: this section describes using development mode without the Google Plugin for Eclipse.
The GWT Development Mode window opens up initially with two tabs. The first provides an interface to launching your GWT module(s) and logs that aren't specific to a particular module.
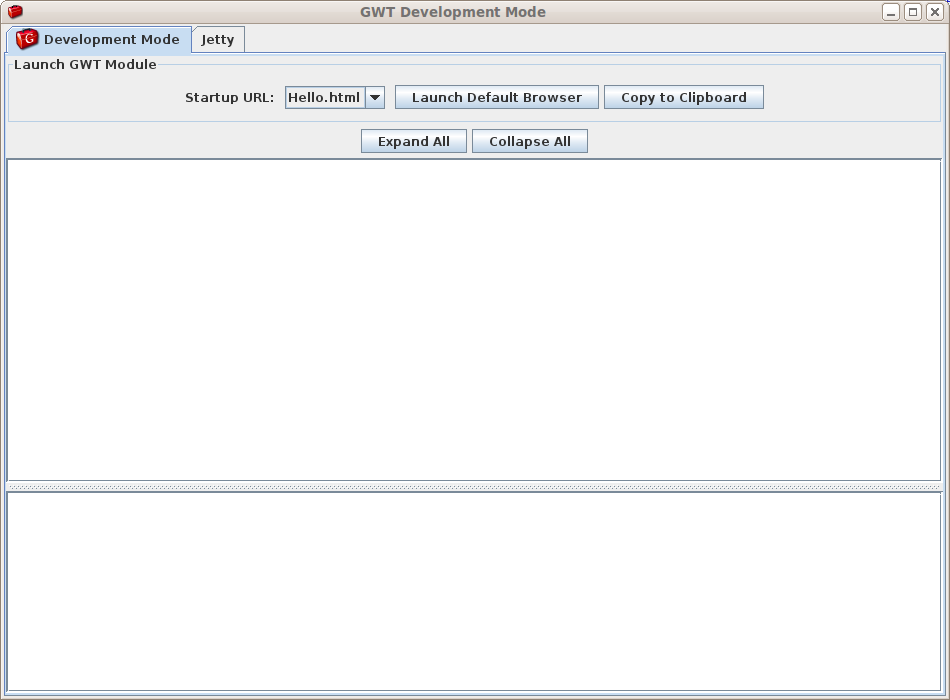
Serving the application
The second tab displays log messages from the embedded web server. By default, development mode runs an internal Jetty instance to serve your web application. This embedded Jetty instance serves directly out of your project's war directory.
You can disable this internal server by passing the -noserver
option to development mode and instead run your own external server. See FAQ "How do I use my own server in
development mode instead of GWT's built-in server?"
Launching a Browser
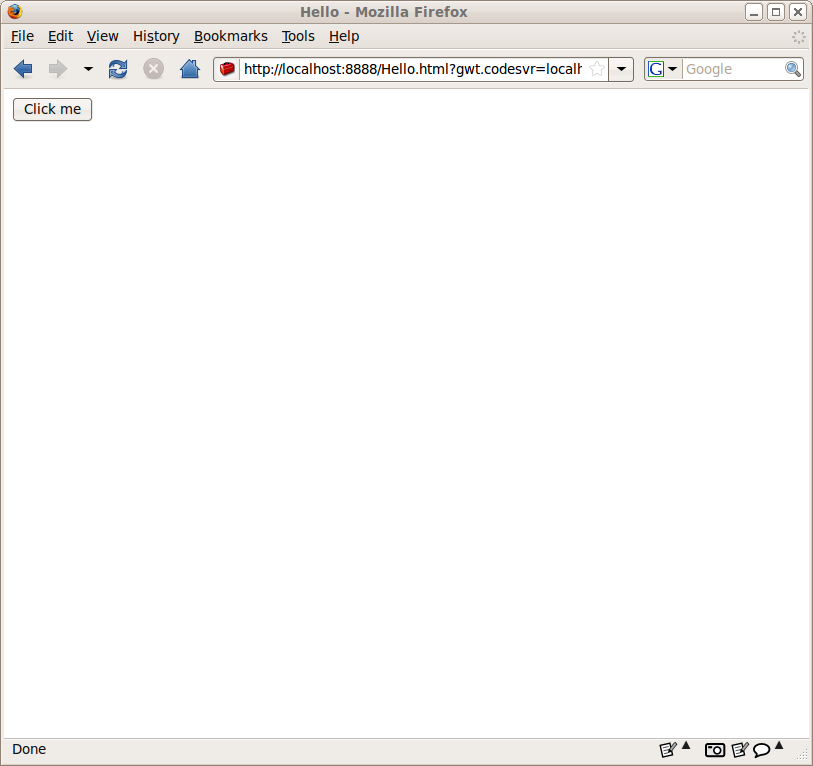
As of GWT 2.0, development mode uses a regular browser instead of an embedded browser. You can use any supported browser, including ones on other machines, as long as it has the GWT Developer Plugin installed. If you use a browser that does not have the plugin installed, you will get a message with an offer to download the plugin.
Browsers are typically opened automatically via the -startupUrl
command line option (though GWT will try to find plausible startup URLs if you
do not supply any). To launch an application, choose the URL you want to use,
and choose Launch Default Browser. GWT uses a number of heuristics
to determine which browser to use, but depending on your setup it may not
launch the one you want. In that case, you can choose Copy to Clipboard
and the URL you need to launch will be copied to the system clipboard (and will
also be shown in the log window). You can then paste this URL into any
browser with the plugin installed, or you can type in the URL to a browser on
a different machine (in which case you will have to change the host names in
the URL as necessary).
When a module is loaded in a browser, you will see a new tab which contains the logs for one URL in a particular browser. If there are multiple modules on one page, there will be a drop-down box to select which module's logs are shown. When you refresh a page, there is a session drop-down box which lets you select which session's logs to show.
Refreshing development mode
You do not need to restart development mode after modifying your source code. Instead, with Development Mode still running, edit client code or resources, save your changes, then refresh the page in your browser. On refresh, your code is recompiled with the changes and the new version is loaded into the browser. Refreshing the browser is much faster than closing and restarting Development Mode.
You might notice that sometimes your changes take effect even if you do not refresh the browser. This behavior is a result of the way development mode interacts with the compiled code, but it is not always reliable. Specifically, it only happens when you make minor changes to existing functions and the IDE is able to replace the running code. To ensure your changes are included, make it a habit to always refresh the browser after making changes.
Reloading server code
Similarly, the Restart Server button in the Jetty tab allows you to
restart the embedded Jetty server without having to close and restart
Development Mode. This is useful when you have made configuration or code
changes to your server-side code. All server-side classes will be reloaded
from scratch with fresh code for your war/WEB-INF/classes and
war/WEB-INF/lib folders. If you are getting an IncompatibleRemoteServiceException
in development mode while using RPC, try restarting the server and refreshing
the client.
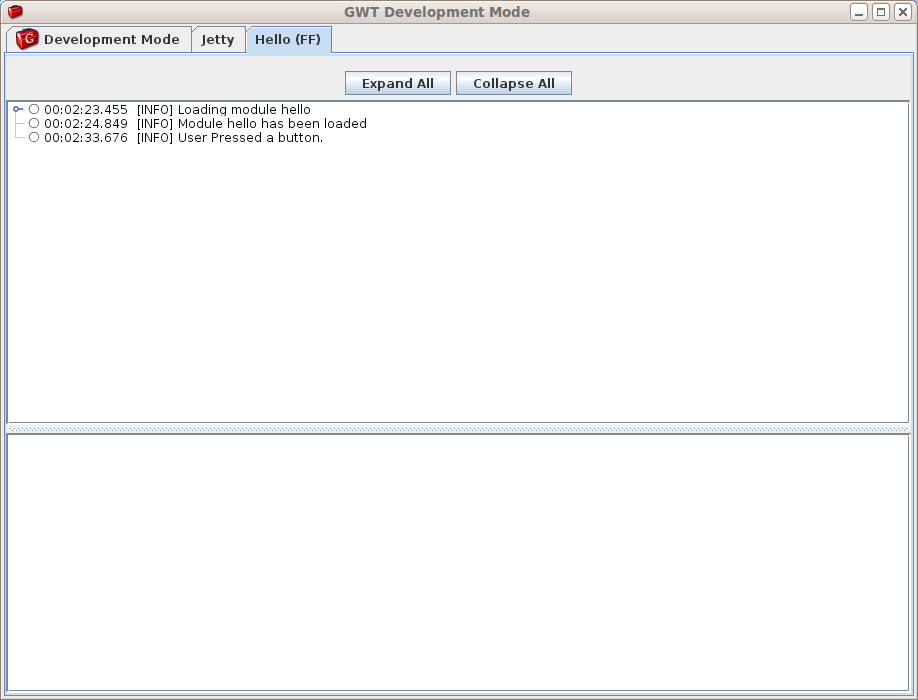
Generating debug messages in development mode: GWT.log()
Debugging messages are displayed within the Development Mode log window. Some of these messages are from GWT. However, you can generate your own debug messages by using calls to GWT.log().
For example, modifying the standard project to emit a debug message inside the ClickHandler results in a debug message displaying on the log window whenever the user clicks the button.
import com.google.gwt.core.client.GWT;

   ...

   button.addClickHandler(new ClickHandler() {
      public void onClick(ClickEvent event) {
        GWT.log("User Pressed a button.", null); // Added debugging message
        if (label.getText().equals(""))
          label.setText("Hello World!");
        else
          label.setText("");
      }
    });
Calls to GWT.log() are intended just for use while debugging your application. They are optimized out in production mode. For example, consider the following change to the onClick() method intended to intentionally trigger an exception:
public void onClick(Widget sender) {
        GWT.log("User pressed a button.", null);
        Object nullObject = null;
        nullObject.toString(); // Should cause NullPointerException
When the application encounters an exception, a message is printed on the module's log window. The exception is highlighted with a red icon. In this example, when you click on the button in the browser window, a NullPointerException is triggered and the back trace for the exception displays in the status area below the log area. Clicking on the exception message or icon displays the full text of the exception in the message area below.

Enabling internal GWT debug messages
The log window can display more verbose debugging if you invoke it by
specifying the -logLevel command-line argument. Specifying the level
of SPAM turns on many messages inside of the GWT engine. These
messages are displayed in a hierarchical tree which can be manipulated by
clicking on individual lines or by using the Expand All and Collapse All icons
in the toolbar.

Using an IDE with Development Mode
When using an IDE such as Eclipse, JBuilder, or IntelliJ, it is easy to use
the IDE's built-in Java debugger to debug your module. Simply set a breakpoint
somewhere inside your code, (such as the onModuleLoad() entry point)
where you want the debugger to stop and let you inspect the state of your
program. For an example of debugging in development mode using the Eclipse
IDE, see the Getting Started tutorial, Debugging a GWT
Application.
An Example Launch
Let's look behind the scenes when you launch your GWT application in
development mode. To run development mode, you start a Java VM using the main
class com.google.gwt.dev.DevMode. If you look inside a generated
ant build.xml, you'll find something like this:
<target name="devmode" depends="javac" description="Run development mode">
  <java failonerror="true" fork="true" classname="com.google.gwt.dev.DevMode">
    <classpath>
      <pathelement location="src"/>
      <path refid="project.class.path"/>
    </classpath>
    <jvmarg value="-Xmx256M"/>
    <arg value="-startupUrl"/>
    <arg value="Hello.html"/>
    <!-- Additional arguments like -style PRETTY or -logLevel DEBUG -->
    <arg value="com.google.gwt.sample.hello.Hello"/>
  </java>
</target>
This is similar to running the following command on the command line:
java -Xmx256M -cp "src;war/WEB-INF/classes;\gwt-2.0.0\gwt-user.jar;\gwt-2.0.0\gwt-dev.jar"
  com.google.gwt.dev.DevMode -startupUrl Hello.html com.google.gwt.sample.hello.Hello
The -startupUrl parameter tells Development Mode which URL(s) to
make available for launching. If the value excludes the domain, the domain is
assumed to be localhost. The port is assumed to be the port running
the embedded server. In the example above, this address is
http://localhost:8888/Hello.html (with an additional parameter giving
the location of the development mode code server).
The final parameter (the one at the end with no flag preceding it) is the module or set of modules we care about. This value is required in order to correctly initialize the war directory with bootstrap scripts for any GWT modules you may wish to run.
Language differences between production mode and development mode
Typically, if your code runs as intended in development mode and compiles to JavaScript without error, production mode behavior will be equivalent. Occasional different problems can cause subtle bugs to appear in production mode that don't appear in development mode. Fortunately those cases are rare.
A full list of known language-related "gotchas" is available in the GWT documentation.
Customizing the development experience
GWT provides several ways to customize the development experience to suit your application's needs:
- The simplest and most flexible option is to use CodeServer instead of DevMode, allowing you to run your own application server, and only rely on GWT to
compile your Java to JS as needed. Start your web server as you normally would without GWT, and provide
CodeServera path where it should write compiled JS with-launcherDir(or-war). See SuperDevMode docs for more details. - It is also possible to pass
-noservertoDevMode, which still keeps the GUI ofDevMode, but with no extra server started. The command line argument to configure the path to write compiled JS is also-war. - Finally, you can supply a custom server implementation to
DevMode. The class must extendServletContainerLauncher, and may be registered for aServiceLoader. If it is the only service-loaded type, it will be used automatically - otherwise, it may be specified by name as a parameter for-server. See theServletContainerLauncherjavadoc for more details.
Using EJBs in development mode
GWT provides either the CodeServer or the DevMode -noserver option for this use case.
Using my own server in development mode instead of GWT's built-in Jetty instance
If you do not need to use, or prefer not to use, the Jetty instance embedded in GWT's development mode to serve up your servlets for debugging, you can use the CodeServer instead of DevMode, while still taking advantage of development mode for debugging your GWT client code. See the next section for using CodeServer rather than DevMode.
If you still want the GUI of development mode, you can use the -noserver option to development mode to disable the embedded Jetty server and instead use your own external server.
If you need the -noserver option, it is likely because your server-side code that handles your XMLHTTPRequest data requests requires something more, or just something
different than Jetty. Here are some example cases where you might need to use -noserver:
- You need an EJB container, which the embedded Jetty server does not support.
- You have an extensive Servlet configuration (with custom web.xml and possibly server.xml files) that is too inconvenient to use with the embedded Jetty.
- You are not using J2EE on the server at all (for example, you might be using Python/Go/Vertx/etc).
When using the -noserver flag, your external server is used by the GWT Development Mode browser to serve up both your dynamic content, and all static content (such as the
GWT application's host page, other HTML files, images, CSS, and so on.) This allows you to structure your project files in whatever way is most convenient to your application and
infrastructure.
Though your own external server handles all static content and dynamic resources, all browser application logic continues to be handled in Java, internal to development mode. This means that you can continue to debug your client-side code in Java as usual, but all server-side requests will be served by your web or application server of choice. (If you are using an IDE such as Eclipse configured to integrate with GWT's development mode for debugging, then using -noserver will prevent you from automatically debugging your server code in the same debugger instance you use to debug development mode. However, if the server software you use supports it, you can of course use an external debugging tools.)
Here is a step-by-step description of how to use -noserver:
- Configure your server however you need to; note the URL which contains the host page for your GWT application.
- Arrange all your static content files (such as the host HTML page, images, CSS, etc.) on the server however you like.
- Edit your development mode execution script (such as your Eclipse run configuration or the ant development build target generated by the GWT webAppCreator) and add or update the following options:
- Add the
-noservercommand line argument. - Change the URL at the end of the argument list to match the URL you recorded in step #1.
- Add the
- Compile your application once using the ant build target. Ideally, you can use GWT's
-waroption to generate output files directly into your external server's static content folder. Otherwise, you'll need to copy the GWT output folder fromwar/<moduleName>to your external server's static content.
Be careful not to omit copying the files in Step #4: This is an action you'll only have to do once, but is a necessary step. However, one important point to note is that
you may need to replace the .gwt.rpc file if your application uses GWT RPC and if the types that your application serializes across the wire implement the java.io.Serializable interface. If these types are changed, or new serializable types are added to your RPC calls, the GWT compiler will generate a new .gwt.rpc file. You will need to replace the old file deployed on your web server with the newly generated file. However, if your web server targets the GWT compiler's war output directory as the war directory for your application, you will not need to re-compile for these changes, and development mode will take care of generating and correctly placing the *.gwt.rpc file.
Development Mode Options
There are many options you can pass to the development mode process to control how you want to start up the development mode browser. These options can differ slightly from version to version, but will generally include the options shown in the command-line help text below:
$ java -cp gwt-dev.jar com.google.gwt.dev.DevMode
Missing required argument 'module[s]'
GWT Web Toolkit 2.13.1
DevMode [-[no]startServer] [-port port-number | "auto"] [-logdir directory] [-logLevel (ERROR|WARN|INFO|TRACE|DEBUG|SPAM|ALL)] [-gen dir] [-bindAddress host-name-or-address] [-codeServerPort port-number | "auto"] [-[no]superDevMode] [-server servletContainerLauncher[:args]] [-startupUrl url] [-war dir] [-deploy dir] [-extra dir] [-modulePathPrefix ] [-workDir dir] [-XmethodNameDisplayMode (NONE|ONLY_METHOD_NAME|ABBREVIATED|FULL)] [-sourceLevel [auto, 1.8, 9, 10, 11, 17]] [-[no]generateJsInteropExports] [-includeJsInteropExports/excludeJsInteropExports regex] [-[no]incremental] [-style (DETAILED|OBFUSCATED|PRETTY)] [-[no]failOnError] [-setProperty name=value,value...] module[s]

where
  -[no]startServer                                  Starts a servlet container serving the directory specified by the -war flag. (defaults to ON)
  -port                                             Specifies the TCP port for the embedded web server (defaults to 8888)
  -logdir                                           Logs to a file in the given directory, as well as graphically
  -logLevel                                         The level of logging detail: ERROR, WARN, INFO, TRACE, DEBUG, SPAM or ALL (defaults to INFO)
  -gen                                              Debugging: causes normally-transient generated types to be saved in the specified directory
  -bindAddress                                      Specifies the bind address for the code server and web server (defaults to 127.0.0.1)
  -codeServerPort                                   Specifies the TCP port for the code server (defaults to 9997 for classic Dev Mode or 9876 for Super Dev Mode)
  -[no]superDevMode                                 Runs Super Dev Mode instead of classic Development Mode. (defaults to ON)
  -server                                           Specify a different embedded web server to run (must implement ServletContainerLauncher). May be specified by fully qualified class name, or if provided by a ServiceLoader, by the service name.
  -startupUrl                                       Automatically launches the specified URL
  -war                                              The directory into which deployable output files will be written (defaults to 'war')
  -deploy                                           The directory into which deployable but not servable output files will be written (defaults to 'WEB-INF/deploy' under the -war directory/jar, and may be the same as the -extra directory/jar)
  -extra                                            The directory into which extra files, not intended for deployment, will be written
  -modulePathPrefix                                 The subdirectory inside the war dir where DevMode will create module directories. (defaults empty for top level)
  -workDir                                          The compiler's working directory for internal use (must be writeable; defaults to a system temp dir)
  -XmethodNameDisplayMode                           EXPERIMENTAL: Specifies method display name mode for chrome devtools: NONE, ONLY_METHOD_NAME, ABBREVIATED or FULL (defaults to NONE)
  -sourceLevel                                      Specifies Java source level (defaults to 1.8)
  -[no]generateJsInteropExports                     Generate exports for JsInterop purposes. If no -includeJsInteropExport/-excludeJsInteropExport provided, generates all exports. (defaults to OFF)
  -includeJsInteropExports/excludeJsInteropExports  Include/exclude members and classes while generating JsInterop exports. Flag could be set multiple times to expand the pattern. (The flag has only effect if exporting is enabled via -generateJsInteropExports)
  -[no]incremental                                  Compiles faster by reusing data from the previous compile. (defaults to ON)
  -style                                            Script output style: DETAILED, OBFUSCATED or PRETTY (defaults to OBFUSCATED)
  -[no]failOnError                                  Fail compilation if any input file contains an error. (defaults to OFF)
  -setProperty                                      Set the values of a property in the form of propertyName=value1[,value2...].
and
  module[s]                                         Specifies the name(s) of the module(s) to host
Any time you want to look up the development mode options available for your version of GWT, you can simply invoke the DevMode class from command-line as shown above and it will list out the options available along with their descriptions. (Run the command from the directory containing gwt-dev.jar or add the path ahead of that file: -cp _path_/gwt-dev.jar.)
Super Dev Mode
Early adopters may wish to try out an alternative to Development Mode. See Introducing Super Dev Mode
Running in Production Mode
After you have your application working well in development mode, you will want to try out your application in your target web browsers; that is, you want to run it in production mode.
Running your application in production mode allows you to test your
application as it is deployed. If you have a servlet component specified in
your web.xml file, your GWT RPC calls will also be served to the
browser. You can also take a different browser or a browser running on another
machine and point it at the same URL (substitute the hostname or IP address of
your workstation for localhost in the URL.)
Running in production mode is a good way to test:
- The performance of your application
-
Development mode uses a special engine to run your app as a mix of both Java
bytecode and native JavaScript. If your code makes many calls back and forth
between Java and JavaScript, your code may seem slower in development mode
than it will actually be in production mode. This can be particularly true of
UI code. On the other hand, intense algorithmic pure Java code will tend to
run faster in development mode, since the JVM outperforms most JavaScript
engines.
If your application displays lots of data or has a large number of widgets, you will want to confirm that performance will be acceptable when the application is finally deployed.
- How your application looks on different browsers
- Because GWT widgets use a browser's native DOM components, the look and feel of your application might change from browser to browser. More importantly, if you are using a style sheet, you will want to inspect your application carefully on each browser.
- How your application logic performs on different browsers
- GWT is designed to provide cross-browser support so that the average GWT developer does not need to worry about cross-browser support. But if you are a widget author or if you are using a third party JavaScript library, you will need to confirm that these components are working correctly on each target browser you plan to support.
Understanding the GWT Compiler
The heart of GWT is a compiler that converts Java source into JavaScript, transforming your working Java application into an equivalent JavaScript application.
The GWT compiler supports the vast majority of the Java language. The GWT runtime library emulates a relevant subset of the Java runtime library. If a JRE class or method is not supported, the compiler will emit an error.
You can run the compiler with the name of the module you want to compile in one of the following manners:
- Run the main class
com.google.gwt.dev.Compilerusingjavafrom the command-line. - If you used the webAppCreator script to create your project, you can use Ant to run the generated
build.xml. - If you are using the Google Plugin for Eclipse, you can compile your application by clicking GWT Compile Project button
 .
.
Once compilation completes successfully, directories will be created containing the JavaScript implementation of your project. The compiler will create one directory for each module it compiles.
C:\gwt-2.6.1\samples\Hello>ant
Buildfile: build.xml

libs:

javac:

gwtc:
     [java] Compiling module com.google.gwt.sample.hello.Hello
     [java]    Compiling 5 permutations
     [java]       Permutation compile succeeded
     [java]    Linking into war
     [java]       Link succeeded
     [java]    Compilation succeeded -- 20.313s

build:

BUILD SUCCESSFUL
Total time: 22 seconds
After running the GWT compiler your war directory should look something like this:
C:\gwt-2.6.1\samples\Hello>\bin\find war
war
war\hello
war\hello\18EEC2DA45CB5F0C2050E2539AE61FCE.cache.html
war\hello\813B962DC4C22396EA14405DDEF020EE.cache.html
war\hello\86DA1DCEF4F40731BE71E7978CD4776A.cache.html
war\hello\A37FC20FF4D8F11605B2C4C53AF20B6F.cache.html
war\hello\E3C1ABB32E39A126A9194DB727F7742A.cache.html
war\hello\14A43CD7E24B0A0136C2B8B20D6DF3C0.cache.png
war\hello\548CDF11D6FE9011F3447CA200D7FB7F.cache.png
war\hello\9DA92932034707C17CFF15F95086D53F.cache.png
war\hello\A7CD51F9E5A7DED5F85AD1D82BA67A8A.cache.png
war\hello\B8517E9C2E38AA39AB7C0051564224D3.cache.png
war\hello\clear.cache.gif
war\hello\hello.nocache.js
war\hello\hosted.html
war\Hello.html
In the above example, war/hello/hello.nocache.js is the script you would include in a host HTML page to load the Hello application. In this case, the host HTML page is
located at war/Hello.html and loads the GWT startup script through the relative URL hello/hello.nocache.js.
You may have noticed in the compilation target in the build.xml file generated by the webAppCreator uses the war output directory as both an input and output source. This doesn't have to be the case, and you can easily configure the war directory as the output directory only, while using other directories as source directory paths by adding build targets to copy static resources from the source to the final output directory. See this war directory FAQ for more details.
The other thing you may have noticed is that there are a number of other files generated along with the GWT compiler output. Of these there are a few that are key to deploying your application.
Key application files
After running the GWT compiler, you'll find the output in the WAR, or Web Archive, folder with the following structure:
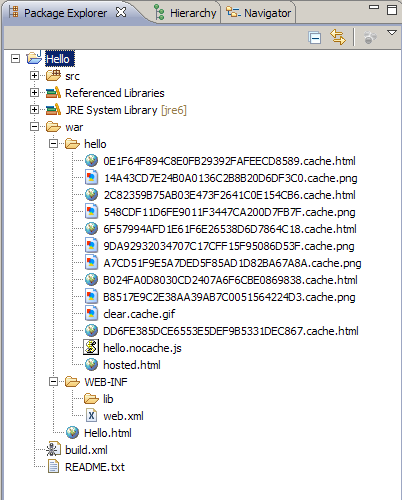
If you've worked with GWT prior to the 1.6 release, the files in the war/hello directory are familiar to you. The only difference is where these files are now generated, and the fact that the host HTML page and CSS files are not in the same directory as the rest of the .cache.html/png files. The path where these files are generated is controlled by the GWT module XML file. These are the key applications files to deploy you GWT application on your web server.
The host HTML page is the first page your clients should visit when they browse to your application and is also where the rest of your application files are loaded from. To load your application, the host HTML page must contain a <script> tag referencing your GWT application bootstrap file (described below). You would typically include a <link> tag referencing your application CSS file as well, unless you inject the stylesheet directly by adding the <stylesheet> tag to your module XML file.
You could also load the script from anywhere else in a website, but the default start page is typically the entry point that developers use to load their GWT applications. The host page from the Hello starter sample application mentioned above is shown below.
<html>
  <head>
    <meta http-equiv="content-type" content="text/html; charset=UTF-8">
    <link type="text/css" rel="stylesheet" href="Hello.css">
    <title></title>
  </head>
  <body>

<script type="text/javascript" language='javascript' src='hello/hello.nocache.js'></script>
    <!-- Along with page title and table headers defined -->
  </body>
</html>
You may have noticed that one of the generated files is named after your module, followed by a .nocache.js suffix. This is the GWT bootstrap file. Similar to the output subdirectory war/<app_name>, the name of this file is also controlled by the rename-to attribute in your module XML file. This file is responsible for choosing the correct version of your application to load for your client based on their browser and locale, or any other custom selection rule (see Deferred Binding). The various versions of your application compliant to each browser / locale are the <md5>.cache.html application files (discussed below).
The host HTML page references this file so that clients visiting your page first download the bootstrap, and the bootstrap script in turn figures out which browser environment it is running in and determines the appropriate version of your application to load. See the documentation on the bootstrap process for more details.
The <md5>.cache.html files generated in the war/<app_name> directory, along with the bootstrap script, are the most important part of the generated fileset. They represent one version of your application tailored to a specific browser (or locale). These are the application files that the bootstrap script selects after it determines which browser it's running on.
Another generated application file that isn't strictly necessary to deploy your GWT application, but required if you're using GWT RPC and the support for the Serializable interface for types transferred through RPC, is the <md5>.gwt.rpc file. The serialization policy file must be accessible by your RPC RemoteServiceServlet via the ServletContext.getResource() call.
Public Resources
All public resources, such as image files, stylesheets or XML files, can be placed anywhere under the war directory or any subdirectory therein during development. As long as references to these resources in your GWT application code hold when deployed, you can expect your application to work properly in production. In GWT 1.6 and later, the <public> tag is still respected, so you can place public resources in a public directory, as defined in your module XML file, and these resources will be copied into the war/<app_name> folder. However, the best practice would be to place public resources in the war directory and work with them from that location. This complies with the standard Servlet 2.5 API specification, and makes it easier to deploy your application if you're planning to deploy on a servlet container.
If you're using ClientBundle in
your application, the generated bundles are placed in the
war/<app_name> directory after compilation.
Perfect Caching
Among other optimization and performance improvement techniques, GWT also offers the concept of "Perfect Caching", which you can take advantage of if you deploy your application correctly.
You may have noticed that the bootstrap script filename contains a .nocache.js suffix, whereas the rest of the GWT application files contain a .cache.html suffix. These are meant as indicators that you can use to configure your web server to implement perfect caching. The bootstrap script is named after a well-known application name (<app_name>.nocache.js), while the GWT application files all contain md5 sums in their names. Those md5 sums are computed from your GWT codebase at the time of compilation. The bootstrap script contains a lookup table that selects the right <md5>.cache.html file when your client first visits your site and loads up your GWT application. The bootstrap process is explained in greater detail here.
The fact that the application filenames will always change if your codebase changes means that your clients can safely cache these resources and don't need to refetch the GWT application files each time they visit your site. The resource that should never be completely cached (an If-Modified-Since fetch is sufficient and saves bandwidth) is the bootstrap script, since it contains the logic necessary to lookup the correct application file. If you were to configure these rules on an Apache HTTP server, you might get something like this in your .htaccess config file, using both mod_expires and mod_headers:
<Files *.nocache.*>
  ExpiresActive on
  ExpiresDefault "now"
  Header merge Cache-Control "public, max-age=0, must-revalidate"
</Files>

<Files *.cache.*>
  ExpiresActive on
  ExpiresDefault "now plus 1 year"
</Files>
GWT Compiler Options
There are many options you can pass to the GWT compiler process to control how you want to compile your GWT application and where you want the output to be generated. These options can differ slightly from version to version, but will generally include the options shown in the command-line help text below:
> java -cp gwt-dev.jar com.google.gwt.dev.Compiler
Missing required argument 'module[s]'
GWT Web Toolkit 2.13.1
Compiler [-logLevel (ERROR|WARN|INFO|TRACE|DEBUG|SPAM|ALL)] [-workDir dir] [-X[no]closureFormattedOutput] [-[no]compileReport] [-X[no]checkCasts] [-X[no]classMetadata] [-[no]draftCompile] [-[no]checkAssertions] [-XfragmentCount numFragments] [-gen dir] [-[no]generateJsInteropExports] [-includeJsInteropExports/excludeJsInteropExports regex] [-XmethodNameDisplayMode (NONE|ONLY_METHOD_NAME|ABBREVIATED|FULL)] [-Xnamespace (NONE|PACKAGE)] [-optimize level] [-[no]saveSource] [-setProperty name=value,value...] [-style (DETAILED|OBFUSCATED|PRETTY)] [-[no]failOnError] [-[no]validateOnly] [-sourceLevel [auto, 1.8, 9, 10, 11, 17]] [-localWorkers count] [-[no]incremental] [-war dir] [-deploy dir] [-extra dir] [-saveSourceOutput dir] module[s]

where
  -logLevel                                         The level of logging detail: ERROR, WARN, INFO, TRACE, DEBUG, SPAM or ALL (defaults to INFO)
  -workDir                                          The compiler's working directory for internal use (must be writeable; defaults to a system temp dir)
  -X[no]closureFormattedOutput                      EXPERIMENTAL: Enables Javascript output suitable for post-compilation by Closure Compiler (defaults to OFF)
  -[no]compileReport                                Compile a report that tells the "Story of Your Compile". (defaults to OFF)
  -X[no]checkCasts                                  EXPERIMENTAL: DEPRECATED: use jre.checks.checkLevel instead. (defaults to OFF)
  -X[no]classMetadata                               EXPERIMENTAL: Include metadata for some java.lang.Class methods (e.g. getName()). (defaults to ON)
  -[no]draftCompile                                 Compile quickly with minimal optimizations. (defaults to OFF)
  -[no]checkAssertions                              Include assert statements in compiled output. (defaults to OFF)
  -XfragmentCount                                   EXPERIMENTAL: Limits of number of fragments using a code splitter that merges split points.
  -gen                                              Debugging: causes normally-transient generated types to be saved in the specified directory
  -[no]generateJsInteropExports                     Generate exports for JsInterop purposes. If no -includeJsInteropExport/-excludeJsInteropExport provided, generates all exports. (defaults to OFF)
  -includeJsInteropExports/excludeJsInteropExports  Include/exclude members and classes while generating JsInterop exports. Flag could be set multiple times to expand the pattern. (The flag has only effect if exporting is enabled via -generateJsInteropExports)
  -XmethodNameDisplayMode                           EXPERIMENTAL: Specifies method display name mode for chrome devtools: NONE, ONLY_METHOD_NAME, ABBREVIATED or FULL (defaults to NONE)
  -Xnamespace                                       Puts most JavaScript globals into namespaces. Default: PACKAGE for -draftCompile, otherwise NONE
  -optimize                                         Sets the optimization level used by the compiler.  0=none 9=maximum.
  -[no]saveSource                                   Enables saving source code needed by debuggers. Also see -debugDir. (defaults to OFF)
  -setProperty                                      Set the values of a property in the form of propertyName=value1[,value2...].
  -style                                            Script output style: DETAILED, OBFUSCATED or PRETTY (defaults to OBFUSCATED)
  -[no]failOnError                                  Fail compilation if any input file contains an error. (defaults to OFF)
  -[no]validateOnly                                 Validate all source code, but do not compile. (defaults to OFF)
  -sourceLevel                                      Specifies Java source level (defaults to 1.8)
  -localWorkers                                     The number of local workers to use when compiling permutations
  -[no]incremental                                  Compiles faster by reusing data from the previous compile. (defaults to OFF)
  -war                                              The directory into which deployable output files will be written (defaults to 'war')
  -deploy                                           The directory into which deployable but not servable output files will be written (defaults to 'WEB-INF/deploy' under the -war directory/jar, and may be the same as the -extra directory/jar)
  -extra                                            The directory into which extra files, not intended for deployment, will be written
  -saveSourceOutput                                 Overrides where source files useful to debuggers will be written. Default: saved with extras.
and
  module[s]                                         Specifies the name(s) of the module(s) to compile
Any time you want to look up GWT compiler options available for your version of GWT, you can simply invoke the Compiler class from command-line as shown above and it will list out the options available along with their descriptions. (Run the command from the directory containing gwt-dev.jar or add the path ahead of that file: -cp _path_/gwt-dev.jar.)