Coding Client side
At this point, you've built the user interface from GWT widgets and panels and wired in the event handlers. StockWatcher accepts input but it doesn't yet add the stock to the stock table or update any stock data.
In this section, you'll finish implementing all of StockWatcher's client-side functionality. Specifically, you'll write the code to the following:
- Add and remove stocks from the stock table.
- Refresh the Prices and Change fields for each stock in the table.
- Implement the timestamp showing the time of last update.
Your initial implementation of StockWatcher is simple enough that you can code all its functionality on the client side. Later you'll add calls to the server to retrieve the stock data.
Adding and removing stocks from the stock table
Your first task is to add the stock code and a Remove button to the stock table. Remember, the FlexTable will automatically resize to hold the data, so you don't have to worry about writing code to handle that.
- Create a data structure.
- Add rows to the stock table.
- Add a button to remove stocks from the stock table.
- Test in development mode.
A. Create a data structure
You need a data structure to hold the list of stock symbols the user has entered. Use the standard Java ArrayList and call the list stocks.
-
Create a data structure.
- In StockWatcher.java, in the StockWatcher class, create a new instance of a Java ArrayList.
public class StockWatcher implements EntryPoint { private VerticalPanel mainPanel = new VerticalPanel(); private FlexTable stocksFlexTable = new FlexTable(); private HorizontalPanel addPanel = new HorizontalPanel(); private TextBox newSymbolTextBox = new TextBox(); private Button addStockButton = new Button("Add"); private Label lastUpdatedLabel = new Label(); private ArrayList<String> stocks = new ArrayList<String>(); -
Eclipse flags ArrayList and suggests you include the import declaration.
-
Include the import declaration.
import java.util.ArrayList;
B. Add rows to the flex table
After the user enters a stock code, first check to make sure it's not a duplicate. If the stock code doesn't exist, add a new row to the FlexTable and populate the cell in the first column (column 0) with the stock symbol that the user entered. To add text to a cell in the FlexTable, call the setText method.
-
Check the stock to see if it exists and if it does, don't add it again.
- In the addStock method, replace the TODO comment with this code.
// Don't add the stock if it's already in the table. if (stocks.contains(symbol)) return; -
If the stock doesn't exist, add it.
- In the addStock method, replace the TODO comment with this code.
// Add the stock to the table. int row = stocksFlexTable.getRowCount(); stocks.add(symbol); stocksFlexTable.setText(row, 0, symbol);- When you call the setText method, the FlexTable automatically creates new cells as needed; therefore, you don't need to resize the table explicitly.
C. Add a button to remove stocks from the stock list
So that users can delete a specific stock from the list, insert a Remove button in the last cell of the table row. To add a widget to a cell in the FlexTable, call the setWidget method. Subscribe to click events with the addClickHandler method. If the Remove Stock button publishes a click event, remove the stock from the FlexTable and the ArrayList.
-
Add the button for deleting the stock from the list.
- In the addStock method, replace the TODO comment with this code.
// Add a button to remove this stock from the table.
Button removeStockButton = new Button("x");
removeStockButton.addClickHandler(new ClickHandler() {
  public void onClick(ClickEvent event) {
    int removedIndex = stocks.indexOf(symbol);
    stocks.remove(removedIndex);
    stocksFlexTable.removeRow(removedIndex + 1);
  }
});
stocksFlexTable.setWidget(row, 3, removeStockButton);
D. Test Add/Remove Stock Functionality
You have one more TODO to code: get the stock price. But first do a quick check in development mode to see if Add Stock and Remove Stock functionality is working as expected.
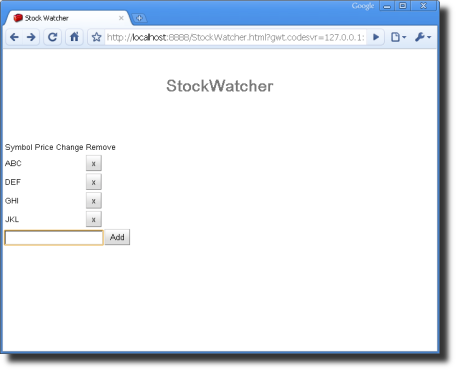
At this point when you enter a stock code, StockWatcher should add it to the stock table. Try it and see.
- Run StockWatcher in development mode.
- Press Refresh in the already open browser.
- Add a stock.
- Enter stock codes in the input box.
- StockWatcher should add the stock to the table. The table resizes to hold the new data. However, the Price and Change fields are still empty. If you enter a stock code in lowercase, it converts the letters to uppercase.
- Verify that you can't add duplicate stocks to the table.
- Add a stock code that already exist in the table.
- StockWatcher should clear the input box but not add the same stock code again.
- Delete a stock.
- Click the Remove button.
- The stock is deleted from the table and the table resizes.
Now you'll tackle that last TODO: get the stock price.
Refreshing the Price and Change fields
The most important feature of StockWatcher is updating the prices of the stocks the users are
watching. If you were writing StockWatcher using traditional web development techniques, you would
have to rely on full page reloads every time you wanted to update the prices. You could accomplish
this either manually (making the user click the browser's Refresh button) or automatically
(for example, using a <meta http-equiv="refresh" content="5"> tag in the HTML header). But
in this age of Web 2.0, that's simply not efficient enough. StockWatcher's users want their stock
price updates and they want them now...without waiting for a full page refresh.
In this section, you'll:
- Automatically refresh the Price and Change fields by implementing a timer and specifying a refresh rate.
- Encapsulate the stock price data by creating a class, StockPrice.
- Generate the stock data for the Price and Change fields by implementing the refreshWatchList method.
- Load the Price and Change fields with the stock data by implementing the updateTable method.
- Test the random generation of stock prices and change values
A. Automatically refresh stock data
GWT makes it easy to update an application's content on the fly. For StockWatcher, you'll automatically update stock prices by using the GWT Timer class.
Timer is a single-threaded, browser-safe timer class. It enables you to schedule code to run at some point in the future, either once using the schedule() method or repeatedly using the scheduleRepeating() method. Because you want StockWatcher to automatically update the stock prices every five seconds, you'll use scheduleRepeating().
When a Timer fires, the run method executes. For StockWatcher you'll override the run method with a call to the refreshWatchList method which refreshes the Price and Change fields. For now, just put in a stub for the refreshWatchList method; later in this section, you'll implement it.
-
Implement the timer.
-
Modify the onModuleLoad method to create a new instance of Timer, as follows:
public void onModuleLoad() { ... // Move cursor focus to the input box. newSymbolTextBox.setFocus(true); // Setup timer to refresh list automatically. Timer refreshTimer = new Timer() { @Override public void run() { refreshWatchList(); } }; refreshTimer.scheduleRepeating(REFRESH_INTERVAL); ... } -
Eclipse flags Timer, REFRESH_INTERVAL and refreshWatchList.
-
-
Declare the import for Timer.
-
If you are using Eclipse shortcuts, be sure to select the GWT Timer.
import com.google.gwt.user.client.Timer;
-
-
Specify the refresh rate.
-
If you are using Eclipse shortcuts, select
Create constant 'REFRESH_INTERVAL'then specify the refresh interval in milliseconds,5000. -
Otherwise, just cut and paste from the highlighted code below.
public class StockWatcher implements EntryPoint {

private static final int REFRESH_INTERVAL = 5000; // ms
private VerticalPanel mainPanel = new VerticalPanel();
-
-
Populate the price and change values as soon as a new stock is added.
-
In the addStock method, replace the TODO comment with the highlighted code.
private void addStock() { ... // Add a button to remove a stock from the table. Button removeStockButton = new Button("x"); removeStockButton.addClickHandler(new ClickHandler() { public void onClick(ClickEvent event) { int removedIndex = stocks.indexOf(symbol); stocks.remove(removedIndex); stocksFlexTable.removeRow(removedIndex + 1); } }); stocksFlexTable.setWidget(row, 3, removeStockButton); // Get the stock price. refreshWatchList(); } -
Eclipse flags refreshWatchList.
-
-
In the StockWatcher class, create a stub for the refreshWatchList method.
private void refreshWatchList() {
    // TODO Auto-generated method stub
}
B. Encapsulate stock price data
Creating a Java class using Eclipse
One of the primary ways GWT speeds AJAX development is by allowing you to write your applications in the Java language. Because of this, you can take advantage of static type checking and time-tested patterns of object-oriented programming. These, when combined with modern IDE features like code completion and automated refactoring, make it easier than ever to write robust AJAX applications with well-organized code bases.
For StockWatcher, you'll take advantage of this capability by factoring stock price data into its own class.
-
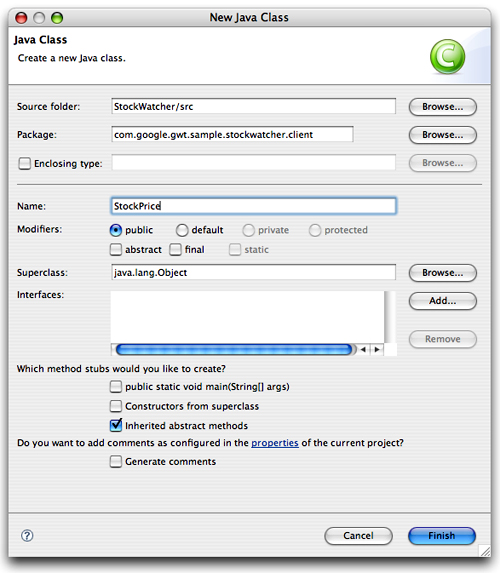
Create a new Java class named StockPrice.
- In Eclipse, in the Package Explorer pane, select the package
com.google.gwt.sample.stockwatcher.client - From the Eclipse menu bar, select
File > New > Class - Eclipse opens a New Java Class window.
- In Eclipse, in the Package Explorer pane, select the package
-
Fill in the New Class Window.
- At Name enter
StockPrice - Accept the defaults for the other fields.
- Press
Finish
- At Name enter
-
Eclipse creates stub code for the StockPrice class.
package com.google.gwt.sample.stockwatcher.client; public class StockPrice { } -
Replace the stub with following code.
package com.google.gwt.sample.stockwatcher.client;

public class StockPrice {

  private String symbol;
  private double price;
  private double change;

  public StockPrice() {
  }

  public StockPrice(String symbol, double price, double change) {
    this.symbol = symbol;
    this.price = price;
    this.change = change;
  }

  public String getSymbol() {
    return this.symbol;
  }

  public double getPrice() {
    return this.price;
  }

  public double getChange() {
    return this.change;
  }

  public double getChangePercent() {
    return 10.0 * this.change / this.price;
  }

  public void setSymbol(String symbol) {
    this.symbol = symbol;
  }

  public void setPrice(double price) {
    this.price = price;
  }

  public void setChange(double change) {
    this.change = change;
  }
}
C. Generate the stock data
Now that you have a StockPrice class to encapsulate stock price data, you can generate the actual data. To do this you'll implement the refreshWatchList method. Remember the refreshWatchList method is called both when the user adds a stock to the stock table, and then every 5 seconds when the timer fires.
Randomly generating the data
In lieu of retrieving real-time stock prices from an online data source, you'll create pseudo-random price and change values. To do this, use the GWT Random class. Then populate an array of StockPrice objects with these values and pass them on to the updateTable method.
-
Generate random stock prices.
-
In the StockWatcher class, replace the stub refreshWatchList method with the following code.
/** * Generate random stock prices. */ private void refreshWatchList() { final double MAX_PRICE = 100.0; // $100.00 final double MAX_PRICE_CHANGE = 0.02; // +/- 2% StockPrice[] prices = new StockPrice[stocks.size()]; for (int i = 0; i < stocks.size(); i++) { double price = Random.nextDouble() * MAX_PRICE; double change = price * MAX_PRICE_CHANGE * (Random.nextDouble() * 2.0 - 1.0); prices[i] = new StockPrice(stocks.get(i), price, change); } updateTable(prices); } -
Eclipse flags Random and updateTable.
-
-
Include the import declaration.
import com.google.gwt.user.client.Random; -
Create a stub for the updateTable(StockPrice[]) method.
private void updateTable(StockPrice[] prices) {
  // TODO Auto-generated method stub
}
D. Populate the Price and Change fields
Finally, load the randomly generated price and change data into the StockWatcher table. For each stock, format the Price and Change columns, then load the data. To do this you'll implement two methods in the StockWatcher class.
- Format the values in the Price field to two decimal places (1,956.00).
- Prefix the values in the Change field with a sign (+/-).
-
Implement the method updateTable(StockPrices[]).
-
Replace the stub with the following code.
/** * Update the Price and Change fields all the rows in the stock table. * * @param prices * Stock data for all rows. */ private void updateTable(StockPrice[] prices) { for (int i = 0; i < prices.length; i++) { updateTable(prices[i]); } } -
Eclipse flags updateTable.
-
Create a stub for the updateTable(StockPrice) method.
-
-
Implement the method updateTable(StockPrice).
-
Replace the stub with the following code.
/** * Update a single row in the stock table. * * @param price Stock data for a single row. */ private void updateTable(StockPrice price) { // Make sure the stock is still in the stock table. if (!stocks.contains(price.getSymbol())) { return; } int row = stocks.indexOf(price.getSymbol()) + 1; // Format the data in the Price and Change fields. String priceText = NumberFormat.getFormat("#,##0.00").format( price.getPrice()); NumberFormat changeFormat = NumberFormat.getFormat("+#,##0.00;-#,##0.00"); String changeText = changeFormat.format(price.getChange()); String changePercentText = changeFormat.format(price.getChangePercent()); // Populate the Price and Change fields with new data. stocksFlexTable.setText(row, 1, priceText); stocksFlexTable.setText(row, 2, changeText + " (" + changePercentText + "%)"); } -
Eclipse flags NumberFormat.
-
-
Include the import declaration.
import com.google.gwt.i18n.client.NumberFormat;
E. Test the random generation of stock prices and change values
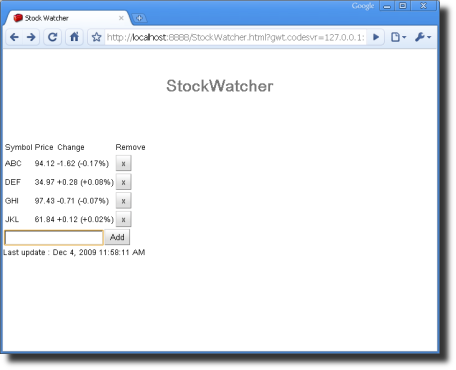
At this point, the Price and Change fields should be populated with the stock data you randomly generated. Try it and see.
- Run StockWatcher in development mode.
- Add a stock.
- The Price and Change fields should have data.
- Every 5 seconds, the data should refresh.
Adding the timestamp
The final piece of functionality you need to implement is the timestamp. You used a Label widget, lastUpdatedLabel, to create the timestamp in the UI. Now set the text for the Label widget. Add this code to the updateTable(StockPrice[]) method.
-
Implement the timestamp.
-
In the updateTable(StockPrice[]) method, copy and paste the highlighted code.
/** * Update the Price and Change fields all the rows in the stock table. * * @param prices Stock data for all rows. */ private void updateTable(StockPrice[] prices) { for (int i = 0; i < prices.length; i++) { updateTable(prices[i]); } // Display timestamp showing last refresh. DateTimeFormat dateFormat = DateTimeFormat.getFormat( DateTimeFormat.PredefinedFormat.DATE_TIME_MEDIUM); lastUpdatedLabel.setText("Last update : " + dateFormat.format(new Date())); } -
Eclipse flags DateTimeFormat and Date.
-
-
Include the imports.
import com.google.gwt.i18n.client.DateTimeFormat; import java.util.Date; -
Test the timestamp.
- Save your changes. In the browser, press Refresh to load the changes.
- The timestamp label should be displayed beneath the stock table. As the Price and Change fields refresh, the timestamp should display the date and time of the last update.
Implementation Note: You may have noticed that the classes DateTimeFormat and NumberFormat live in a subpackage of com.google.gwt.i18n, which suggest that they deal with internationalization in some way. And indeed they do: both classes will automatically use your application's locale setting when formatting numbers and dates. You'll learn more about localizing and translating your GWT application into other languages in the tutorial Internationalizing a GWT Application.
What's Next
At this point you've built the interface components and coded all the underlying client-side functionality for the StockWatcher application. The user can add and remove stocks. The Price and Change fields update every 5 seconds. A timestamp shows when the last refresh occurred.
Although you have not compiled StockWatcher yet, you can test it in production mode here: Run StockWatcher
A Bug
For the sake of this tutorial, we introduced an error into the code. Can you detect it?
Look at the change percentages. Don't they seem a bit small? If you do the math, you'll discover that they appear to be exactly an order of magnitude smaller than they should be. There's an arithmetic error hiding somewhere in the StockWatcher code. Using the tools provided by GWT and your Java IDE, your next step is to find and fix the error.